Management of custom tools and scripts in Fusion can begin to become difficult as the number of assets increases. Not only does finding the specific script you need to run get harder when you have to sort through dozens of others, but discoverability becomes a problem. To counteract these issues, I built this Toolbox script to give easy access to the most useful of our assets. For TDs interested in the nuts-and-bolts, there is a detailed description of the code down below with the original version of this article. To be clear, this script doesn’t actually do anything on its own. It only provides an interface for easy access to whatever you decide to add to it.
To install the Toolbox, download this file: MuseToolBox.zip
Unzip it into your Fusion Scripts folder. It should place the file MuseToolBox.lua in the Comp subfolder, and three files in a new folder named Support: Cog.png, MuseToolBox_configurator.lua, and Toolbox_buttons.cfg
Run the script from the Script menu in Fusion.
Documentation
Overview
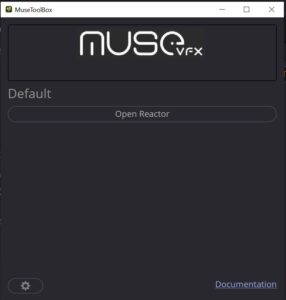
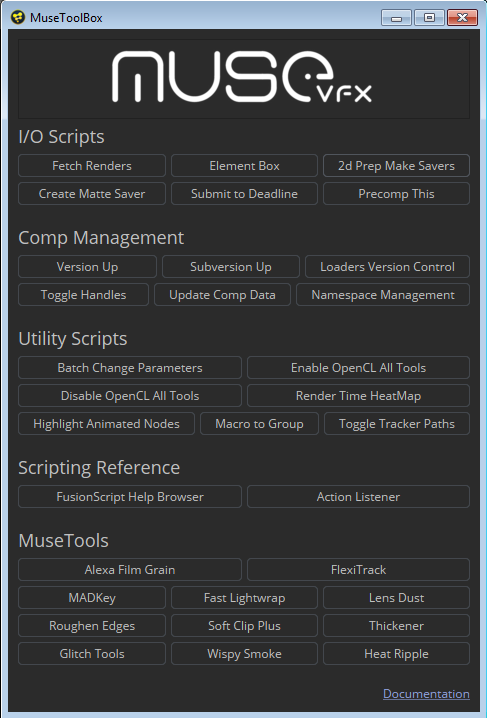
Upon initial run, the Toolbox contains only one Category: Default and one Button: Open Reactor. I presume that anyone who is aware of my blog probably has Reactor already installed, so that button should work immediately.
In the lower-right corner is a Documentation link, which leads to this web page.
In the lower-left corner, you’ll see a button with a cog wheel icon. This opens the Configurator, which is used to add new Categories and Buttons to the Toolbox.
Configurator
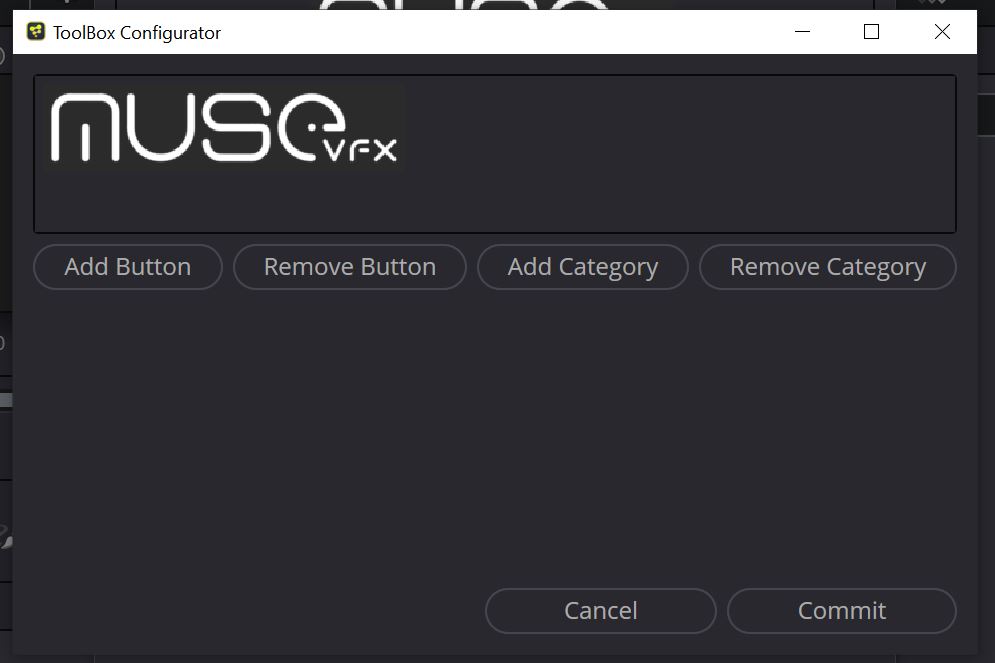 The Configurator has four modes. You can Add or Remove both Buttons and Categories. Upon committing a change to the Toolbox, the UI will not automatically update, so you’ll need to close it and reopen to see the changes.
Adding a Category
Open the Configurator using the Cog button, then choose Add Category. Categories require both an ID and a Text entry. IDs must be unique, and the Text entry should be, but it will still work if it’s not.
Removing a Category
Open the Configurator using the Cog button, then choose Remove Category. Type the Text name of the Category you wish to remove, not its ID. Note that if you have multiple Categories with the same name, all of them will be removed at once.
Adding a Button
Open the Configurator using the Cog button, then choose Add Button. Button ID must be unique to the button you are creating. Button Text is what will display in the UI. Parent Category ID determines which Category heading the button will appear under.
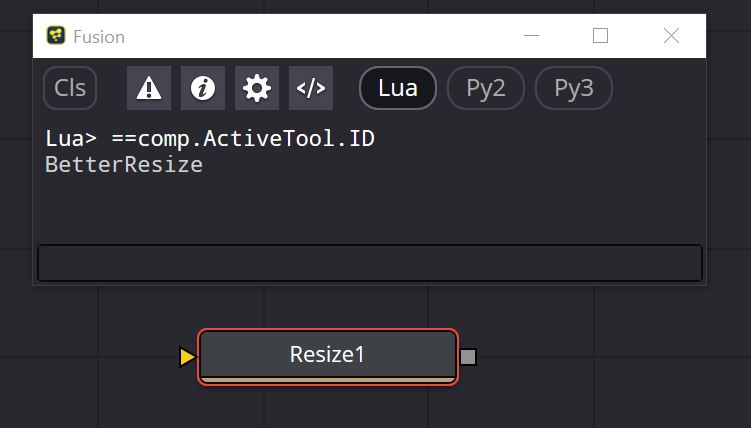 If you are adding a Script or Macro, the Path to Item field needs to contain the path to the file on disk. Pathmaps work in this field. For Tools, enter the tool’s ID. The simplest way to discover a tool’s ID is to add it to the Flow, select it, and in the Console View, type
 ==comp.ActiveTool.ID, as illustrated to the right. The Console will respond by displaying the tool’s scripting ID, which is not always the same as its name, as you can see from this query of the Resize tool.
Modules are a special case that let you include custom behavior in case you need the ToolBox to do something I didn’t think of when I wrote it.
Type of Item can be Script for any kind of script, both Lua and Python; Macro, which will call any kind of .setting file, whether it’s a typical macro or just a collection of nodes; Tool can add any Fusion tool, Fuse, or Plug-In; Module executes additional functions that can be written into the script as needed.
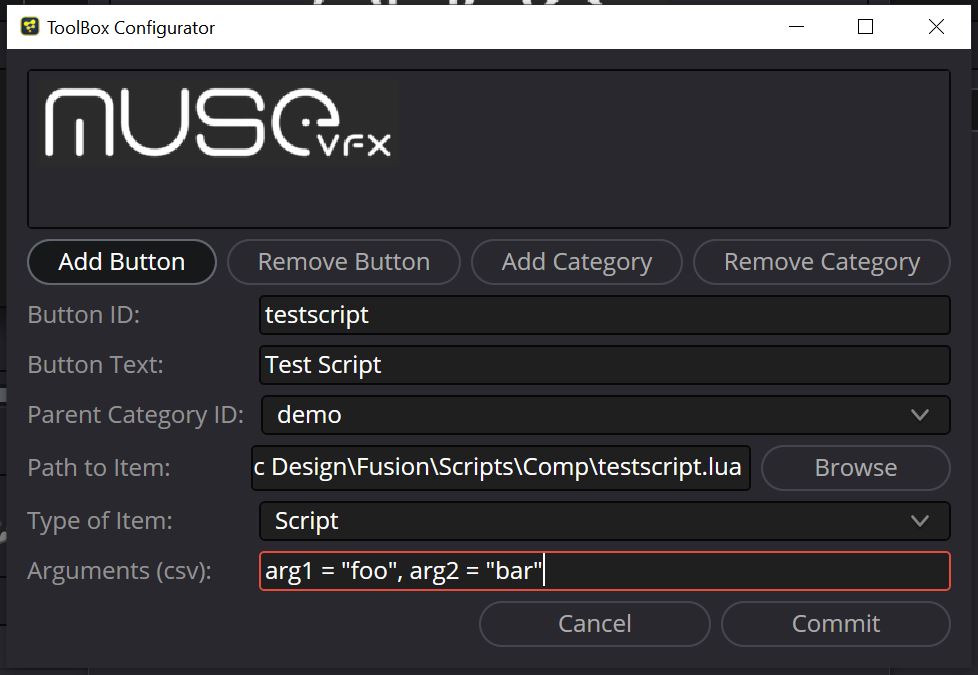
If Script is selected in Type of Item, the field Arguments (csv) appears. If a script requires runtime arguments, they can be provided here as key/value pairs separated by commas. For instance, as you can see above, I have provided two arguments: arg1 = “foo” and arg2 = “bar”. These two arguments will be available as variables inside the script with their associated values. The variable tool is automatically passed to every script, with its value being composition.ActiveTool. This permits ToolScripts to operate as expected even if they are not launched from the tool itself.
The Arguments line is not well-tested. It should work for strings and numbers, but if you try to put anything more complex in there I’m not sure what will happen.
 Nuts ‘n’ Bolts
For those interested in the code behind the thing, the rest of this article is a description of how it works, with some additional information about a couple of hidden features.
Update October 2021: I’ve added some features to the script to make it easier to manage. The cog icon in the lower left corner of the new tool opens a Configurator script that makes it easy to add new buttons without having to go into the table and edit text by hand. I’ve also removed the buttons and categories tables to a separate file so you can tinker with those without risk of damaging the script itself. I’ll drop some descriptions of the code behind those features in at appropriate places later in the article. I’ll signpost them with a bold Update line like the one on this paragraph.
We use quite a few scripts and custom tools at Muse VFX, and using Fusion’s built-in methods of organizing them was starting to get cumbersome. I built a little toolbox panel to ease the burden of keeping track of everything, inspired by SirEdric’s ScriptScript script at We Suck Less. It’s a nice example of a responsive script that is easy to maintain and attractive. It also extended my understanding of Fusion’s UI Manager, enabling even more options in the future. Let’s take a look under the hood!
The back end portion of the script is fairly simple. I just needed a way to execute other scripts, and add tools and settings from within this one. There are four different modes: Execute a script, add a tool (including Fuses but excluding macros), paste a .setting file (both macros and templates), and launch a custom module. By template here, I mean a collection of preconfigured nodes. It’s just like a macro, only it’s not wrapped in a group and has no external controls.
The command to run a script is
composition:RunScript(path, [arguments])
RunScript() is a method of the composition object in Fusion and is documented in the Fusion 8 Scripting Guide.
Adding a Fuse to the Flow is also very simple, since they are treated just like other Fusion tools: composition:AddTool(id) Again, this method is documented in the Guide.
Adding a macro or a .setting requires the use of Fusion’s relatively new Actions system:
composition:DoAction("AddSetting", {filename = path})
![]()
DoAction() is another method of composition, but it is not documented in the Scripting Guide, which is older than the Actions system. Not very many Fusion features use the Actions system at this point, but for those that do, you can get information about them by using Andrew Hazelden’s ActionListener script, available with the UI Manager Examples in Reactor.
The UI Manager Examples are invaluable in learning how to create a Fusion GUI. It certainly still takes some practice, and there is a lot of information that still needs to be teased out through experimentation, but they certainly gave me a huge leg up.
A brief note about some debugging code: You might notice some functions dprint() and ddump(). These are library functions that key off the presence and state of a DEBUG global variable. You can find the functions themselves in the finished script at the bottom of the article, but I won’t go into any detail describing them as they’re fairly straightforward.
Defining Buttons
Update: I wanted the toolbox to be easy to update and understand, so I built it to be as modular as possible. The buttons were originally defined in a table near the top of the main() function, but for ease of use, I removed them to a separate file in the Scripts/Support folder called Toolbox_buttons.cfg That table looks like this:
BUTTONS = {

{ID = id, Text = string, parent = string, script = [[path]], args = table,},

{ID = id, Text = string, parent = string, macro = [[path]],},

{ID = id, Text = string, parent = string, popup = string, args = [[path]],},

{ID = id, Text = string, parent = string, fuse = tool_id,},
}
The ID field provides a handle to uniquely identify each button. Text is the name that appears on the button in the GUI. Parent is the category in which the button appears.
Script defines a path to the Lua or Python script to be run. An args field accompanying the script field takes a table of arguments. Most commonly, this is the currently selected tool so that tool scripts can be run from the panel.
Macro takes a path to a .setting file; templates and macros work exactly the same, so this field works for both.
Popup will open a new window with a set of buttons created dynamically from a folder full of files. The args field provides the path to that folder. My version of this script uses that feature for the Glitch tools.
Fuse provides only the tool id from Fusion’s registry.
To fetch this table (and the associated CATEGORIES table) from an external file, I wrote a function called getConfig(), which takes a path as an input and executes the file on that path as Lua code:
function getConfig(path)

if bmd.fileexists(path) then

io.input(path)

local data = io.read("*all")

dostring(data)

end

io.input(stdin)

return CONFIG

end
I have found this little snippet to be useful for getting project-specific settings for various other pipeline scripts without needing to hard-code exceptions.
Defining Categories
With the desired buttons defined, the next thing to be done is to create the categories and collate the buttons for each one. The global constant table variable CATEGORIES is also defined by the Toolbox_buttons.cfg and is read in at the same time. The categories initially consist simply of an ID and Text. For each entry in this table, we create a sub-table called buttons, then we scan through the BUTTONS table and find each button that has a parent that matches the category’s ID. The button entry is inserted into the appropriate category’s buttons subtable. Here’s what that looks like:
-- Collate buttons in each category
for i, category in ipairs(CATEGORIES) do
category.buttons = {}
for i, button in ipairs(BUTTONS) do
if button.parent == category.ID then
table.insert(category.buttons, button)
end
end
end
Although from a program efficiency standpoint it would seem better to just make the category and button table to begin with, by separating them in this fashion, we can easily move a button to a different category by changing just one field name instead of having to cut-and-paste the entry from one category sub-table to another. It’s possible this could be accomplished by looping through the BUTTONS table instead, and it would only need to do so once instead of scanning the entire table for each category.
UI Manager
Now let’s move on the UI Manager stuff. After knocking together a half-dozen scripts or so, I realized that it would simplify my life if I had a main window with a few standard features that I could just copy from a library into each script as needed. Here is my library’s createMainWindow() function:
function createMainWindow(x, y, width, height, title, id, link)
dprint('createMainWindow')
-- Generate HTML for logo header
html = "<html>\n"
html = html.."\t<head>\n"
html = html.."\t\t<style>\n"
html = html.."\t\t</style>\n"
html = html .."\t</head>\n"
html = html .."\t<body>\n"
html = html .."\t<div>\n"
html = html .."\t<div style=\"float:right;\">\n"
html = html .. museLogo()
html = html .. "\t</div>\n"
html = html .. "\t</body>\n"
html = html .. "</html>"
-- Create the window
window = disp:AddWindow({
-- Window properties
ID = id,
WindowTitle = title,
--Geometry = {x, y, width, height},
-- Main window container
ui:VGroup{
ID = 'root',
-- The logo header and optional progress bar.
ui:VGroup{
ID = 'header',
Weight = 0,
ui:TextEdit{
                ID = 'museLogo',

ReadOnly = true,

Alignment = { AlignHCenter = true, AlignTop = true, },

MinimumSize = {286, 80},

MaximumSize = {width * 2, 80},

HTML = html,

},
          --ui:TextEdit{

ID = 'ProgressHTML',

ReadOnly = true,

MinimumSize = {650, 32},

MaximumSize = {width * 2, 32},

Weight = 1,

FontPointSize = 1,

},
},
-- This holds the dynamic content
ui:VGroup{
ID = 'content',
Weight = 2.0,
},
-- Footer contains the window control buttons
ui:VGroup{
ID = 'footer',
Weight = 0.0,
ui:HGroup{
ID = 'control',
Weight = 0.0,
ui:Label{
ID = 'link',
Text = link,
Alignment = {AlignRight = true, AlignTop = true, },
WordWrap = true,
OpenExternalLinks = true,
},
ui:HGap(width - 300),
ui:Button{
ID = 'cancel',
Text = 'Cancel',
},
ui:Button{
ID = 'next',
Text = 'Next',
},
},
},
},
})
return window
end
Some items of note. First, if you look in that series of lines that create HTML, you’ll see a reference to the function museLogo(), which generates the branding image at the top of my UI Manager windows. I used the Base64-Image string generator to convert our logo into something that could be embedded into the script without requiring any external resources. Thanks go once again to Andrew Hazelden for demonstrating how to create an HTML string and insert it into a TextEdit widget. You can see the entire museLogo() function in the complete script at the end of this article. The Base64 is too long to post here.
Next I’d like to draw your attention to the commented-out TextEdit widget called ProgressHTML. Some scripts take a bit of time to execute, so I’ve reserved a place right below the logo for a progress bar. Not every script uses it, so it’s disabled by default. The toolbox doesn’t need it, so it won’t be demonstrated here. Hopefully I’ll find the time to share more scripts that do make use of the progress bar.
After the header comes an empty VGroup called content. Since this is a generic function that just creates a shell of a window, there is nothing here—it’s simply a container into which the window’s main contents will be inserted during script execution. We’ll see how that works shortly.
Finally, the standard footer contains an optional hypertext link, which I generally use to point to documentation on our internal wiki, and the Cancel and Next buttons, which are useful in the majority of scripts. In this case they will be commented out since they aren’t needed.
In this script, I call the function like so:
local x = nil
local y = nil
local width = 400
local height = 400
-- Create main window
window = createMainWindow(x, y, width, height, 'MuseToolBox', 'main', '<a href="http://www.bryanray.name/wordpress/toolbox-ui-script-for-fusion/">Documentation</a>')
window:Resize({ width, height })
content = window:GetItems().content
In the createMainWindow() function, I commented out the Geometry attribute so the window will always appear in the center of the screen. You can put it in a specific spot, or have it appear under the user’s mouse, but ultimately putting it in the center feels most natural. Since Geometry is disabled, window:Resize() does the job of setting the window’s initial size. This will get overridden again when the buttons are added, but it establishes a fixed minimum size so that the logo always fits and the window is never larger than it needs to be. The final line creates a handle to that content widget I mentioned earlier.
Next we’ll create the category headers and insert the buttons:
for i, category in pairs(CATEGORIES) do
local rows = math.ceil(table.getn(category.buttons) / MAX_COLUMNS)
local pixelSize = 18
local gap = 5
if category.suppressGap == true then
gap = 0
end
if category.suppressLabel == true then
pixelSize = 1
end
    if category.episode and category.episode ~= episode then

-- Do not add to panel

elseif category.project and category.project ~= project then

-- Do not add to panel

else
content:AddChild(ui:VGroup{ ID = category.ID..'Panel', Weight = 0,
ui:VGroup{
                ID = category.ID..'Header',

Weight = 0,

ui:Label{

ID = category.ID..'Label',

Text = category.Text,

Font = ui:Font{PixelSize = pixelSize},

},

},
})
for i=1, rows do
content:GetItems()[category.ID..'Header']:AddChild(ui:HGroup{
         ID = category.ID..i,

Weight = 0,

})
end
content:GetItems()[category.ID..'Header']:AddChild(ui:VGap(10))
-- Create buttons
for i, button in ipairs(category.buttons) do
local parent = button.parent..math.ceil(i/(table.getn(category.buttons)/rows))
addUIButton(parent, button.ID, button.Text)
        end

end
end
For each category, the first thing is to determine the number of rows we’ll need, given the maximum number of columns and the number of buttons in the category. math.ceil() returns an integer, rounded up, so if 7/3 = 2.333…, math.ceil(7/3) = 3. pixelSize determines the size of the category header font. I think the value is the x-height, but I haven’t taken the time to be sure about that. In any case, it’s easy enough to hit the desired size by trial-and-error. The gap determines the distance between the last button in a category and the next header. If for some reason you want to prevent a header from showing up, you can give it some optional attributes in the CATEGORIES stable to suppress it and/or the gap.
Update: There is some code elsewhere in the script to detect project and episode names based on the location of the .comp file. If there are categories present in the table with values for either project or episode, they will only be shown if analysis of the .comp file indicates that it belongs to that project or episode. Detecting these names depends on the TD properly setting some of the global variables at the top of the script. There are instructions in the code about how that works.
Now we finally get to populate the content panel. The AddChild() function lets us insert new widgets into an existing UI Manager window. The ID attribute of the widget and its sub-groups is created dynamically from the category ID, so we don’t need to know ahead of time how many categories there are or what they’re called. Once the category’s group is created, we create even more subgroups—one for each row that we determined we would need. Since we haven’t assigned the category to a variable, we’ll query the window for the category we want like this:
content:GetItems()[category.ID..'Header']:AddChild(ui:HGroup{ID = category.ID..i, Weight = 0, })
GetItems() returns a table of items in the content panel. We don’t care about the entire list, though, just the one with a specific name. To that item, we add a new child named for the category with a numeral appended: Utility1, Utility2, Utility3, and so forth.
And at long last we insert the buttons themselves into the row groups:
local parent = button.parent..math.ceil(i/(table.getn(category.buttons)/rows))
addUIButton(parent, button.ID, button.Text)
That first line contains a long expression that breaks down like so: button.parent is an entry in the master table that holds the parent category for the button. We’ve already covered what math.ceil() does. That leaves the math problem inside—i is the index of the button in the category.buttons table, which is divided by the total number of buttons and again by the number of rows. This ultimately results in a category name followed by an integer: Utility1, Utility2, Utility3… That’s the name of the row the button goes into, and we feed that to the function addUIButton(), along with the button’s ID and it’s human-readable name (which is often the same as the ID, but not always.)
Here’s the addUIButton() function:
function addUIButton(parent, ID, name)
if not name then
name = ID
end
local content = window:GetItems()[parent]
content:AddChild(ui:Button{ ID = ID, Weight = 1, Text = name, })
end
As you can see from that first if statement, the name argument is optional. If it isn’t provided, the text on the button will be the same as the ID. The rest of the function is the same thing we saw above: We get an item from the window with an ID that matches the parent argument. Then we use AddChild() to make a button with the appropriate ID and Text. The Weight attribute ensures that the buttons expand to fit the available space.
After having put all of those widgets into the UI, you’ll likely find that they’ve just been stacked on top of one another. To sort out the mess, call window:RecalcLayout(). That will re-render the window and make it beautiful.
Update: New to this version of the script is the Cog icon in the lower left corner. This calls up an additional support script: Toolbox_configurator.lua. Getting that cog icon on the button was a bit of an adventure of its own. For full details, check out the thread on WSL where I asked about it. Andrew’s script is a much more elegant look at how to get this done than mine is, but I will point out one difficulty I had: Since Cog.png is in the root of the .fuskin archive, the function provided by Andrew didn’t work right out of the box—it can apparently only fetch files that are in sub-folders. I had to hard-code the file I wanted to extract. I’m sure with a little elbow grease that I could sort that out and modify the function, but I was eager to get the thing working instead of perfect. “Perfect is the enemy of good.” —Voltaire (maybe)
Event Handling
With the UI configured, the only thing left to do is control what happens when the user interacts with it. UI Manager is a variant of the Qt framework, and it uses the same concept of “slots and signals.” You can look that up in numerous Qt tutorials if you like. Briefly stated, whenever the user interacts with the window—in this case, clicks a button or closes it—a signal, or event, is generated. The UIDispatcher listens for these events and executes a function whenever it receives one. The event contains information about what caused it: All of the attributes of the widget that was activated and what exactly was done to it. In this case, the only thing we’ll listen for is the button’s ID when it is clicked.
In most UI Manager-based scripts, you’d create your event handlers explicitly: function window.On.Next.Clicked(ev)
<some code>
end
In this case, we can’t do that because we don’t know the ID of the buttons before-hand. Instead, we need to create these event handlers dynamically, just like we did the buttons themselves. We’ll start by creating a table to hold the functions, then loop through the BUTTONS table, creating an event handler for each entry:
local dynamicFunctions = {}
for i, button in ipairs(BUTTONS) do
dynamicFunctions[button.ID] = {}
dynamicFunctions[button.ID].Clicked = function (ev)
if button.macro then
_fusion.CurrentComp:DoAction("AddSetting", { filename = button.macro })
elseif button.popup then
dispatcher(button.popup, button.args)
elseif button.fuse then
_fusion.CurrentComp:AddTool(button.fuse)
else
_fusion.CurrentComp:RunScript(button.script, args) -- Arguments must be passed as a table.
end
end
end
Lua’s indifference toward variable typing is really cool because it allows us to put pretty much anything we want in a table, including functions. And that allows us to create functions that do things we couldn’t anticipate at the time of writing the code. As a result of running this loop, we’ll wind up with a table that looks something like this:
dynamicFunctions{
FetchRenders{
        Clicked = function(ev) {

_fusion.CurrentComp:RunScript(S:\...\FetchRenders.lua)
}
}
MADKey{
        Clicked = function(ev) {

_fusion.CurrentComp:DoAction("AddSetting", { filename = S:\…\MADKey.setting })

}
RSCameraExtractor{
        Clicked = function(ev) {

_fusion.CurrentComp:AddTool("Fuse.RSCameraExtractor")

}
}
And we can call one of these functions with dynamicFunctions[FetchRenders].Clicked
So to prepare the event handlers, we run a for loop over the dynamicFunctions table:
for i, func in pairs(dynamicFunctions) do
window.On[i] = func
end
Modules
There are two final bits to talk about. If a button has the popup attribute, the script will execute a secondary module. I designed it to give me the ability to put the Glitch Tools macros in a category all their own. The glitchTools() function opens another window and populates it with buttons from .setting files found in a designated folder. There is a dispatcher() function that lets you call additional modules with customized behavior.
With the information presented above, you should be able to figure out how glitchTools() works on your own.
The Quoteboard
There is a hidden feature that I haven’t fully generalized yet: A routine to call up a random quotation and display it at the bottom of the window. It’s working at Muse, but it requires an additional Lua library to interpret JSON files, and I can’t remember which one I used. In any case, if you add a global variable QUOTEBOARD = true, then uncomment some of the lines in createMainWindow(), you can play with that. It should activate buttons to add new quotes and to create a list of all quotes that you can use to delete entries. There’s an additional support script called QB_edit.lua that handles that latter feature.
The Final Word
Update: This new version of the script is not as self-contained as the original. In addition to the script itself, you’ll need a prototype of the Toolbox_buttons.cfg file and the MuseToolBox_configurator.lua script. These should both live in your Scripts/Support folder, while the main script goes in Scripts/Comp. To make things easy, I’ve zipped it up. If you unzip the archive in your Scripts folder, the various pieces should go to the correct spots.
To save confusion, I’ve cleared out all of the buttons except for one that will open Reactor, since everything in the previous script was hard-coded to locations on the Muse file servers and therefore didn’t work.
Enjoy!
Hi Bryan. Tried your script in Fusion within Resolve 17. Was really hoping to the “Version Up” would be use but nothing in the script seems to work. Are you still maintaining this script and if so have you tried it in Resolve/Fusion?
None of the buttons will likely work because the scripts and tools aren’t embedded in the toolbox. It’s intended to call scripts from your own environment, and the provided buttons are merely there to show how it’s set up.
This isn’t a ready-to-use script, but a guide for TDs to set up something of their own. However, I have made some improvements to make it easier to use. I’ll spend some time this week updating the article with those.
The long-and-short of it at the moment is that if you have assets you’d like to run from the Toolbox, you’d need to alter the script itself to put them in the BUTTONS table beginning at line 95. You might also want to modify the CATEGORIES table at line 41 to customize it with your own desired organization.
Oh right. All the scripting is very much over my head but I have been looking for an effective way to version up rendered shots within Fusion. I don’t suppose you’re in a position to be able to release those in-house scripts to anyone else?
That script operates on the comp name and the Saver’s filename, neither of which is part of Resolve’s architecture, so I don’t think it would help you at all, even if I got permission to share it.
There is an old version up script out there that I think needs to be updated and put into Reactor, though. I’ll try to make the time to fix it up and get it submitted. If I do, I’ll post a thread about it at We Suck Less, so keep an eye out there for developments.
that would be great. Any other useful pipeline tools you can recommend?
Pipelines are often bespoke and sensitive to specific configurations and file systems, so it’s tough to recommend anything whole-heartedly. There are quite a few bits and bobs that I can’t do without, but they often need retooling to work elsewhere. As I go through all of my existing scripts, I’ve been doing my best to generalize them so they can be used elsewhere with a minimum of configuration, but almost everything needs at least a little tweaking to work in a given environment.
I did a very long write-up at WSL about making a Version Control script for Loaders. It lets you quickly choose new versions for large numbers of CG renders. And there are things like Archive Composition and Convert Footage. But again, they’re designed for Fusion standalone and may not work quite right in Resolve.
Smaller bits of tech are things like a Make Local button I add to my Loaders, which will detect if a file is in the current comp’s file structure somewhere, and if it isn’t, it will copy it to an appropriate spot and relink it. I think I did some in-public development of that one on the official BMD forums, but I don’t remember for sure.
Macros and Fuses are easy to transport to other facilities. Pipeline not so much!
Hello Bryan,
Seems that you an expert in fusion scripting so i think you are the right person to be asked some questions below.
Q1. How to obtain in the running script requred values of the tools parameters in the composition.
They seem to be complex structures with assigned operator “=” to set value but it is not working to obtain value of the parameter, it is bured somewhere deep in the structure of the tool.
Is there some function or method to obtain that value ?
I just want to write some script that uses some values of some properties of the tools but not able to access them.
Q2. Why some varaibles and data available in script itself do not accessible in the same script statement if it placed in tool “Frame Render Script” and “Start/End Render Scripts” or expressions or appear there with different names ( e.g. time) which are not valid in separate script?
Is there any list of global fusion composition variables which could be used both in standalone scripts or in these field mentioned above.
I have previous experience with strict rules languages and it is sometimes not easy to grasp some loose things in sripting languges like LUA
My idea is to do some changes in the tools during execution along time frame in one pieces of code placed in some tool “Frame Render Script” and “Start/Stop Render Scripts” instead of doing keyframe changes in many different places which is later very difficult to trace.
In other words – to have some central automation engine/tool for the entire fusion composition where everything could be seen and managed from one place.
Ideally to create “Automation” tool used only to be as placeholder for the entire composition automation script.
Problem with scripting in fusion is that scripting manual does not provide full explicit information about everithing under the hood and it is almost impossible to find required information on the internet except for some basic things.
Appreciate your feedback,
Regard,
Vlad
A blog comment is not the easiest place to have a conversation of this sort, but I shall do my best!
For more comprehensive help, I recommend joining the We Suck Less forum, which is where most of the most experienced Fusion TDs hang out.
Q1: To get the value of a parameter, you need to provide not only its name but also the time at which to query it, since a parameter’s value is not constant across the entire timeline. So to get, for instance, the value of the Gain control of a tool named BrightnessContrast3, you would do something like this:
myvar = comp.BrightnessContrast3.Gain[comp.CurrentTime]
For parameters that by their nature cannot animate, such as a Filename, you can use fusion.TIME_UNDEFINED, but it’s really just semantic; it evaluates to a very large… er, very small, I guess, negative integer.
Q2: The in-tool scripts have a limited scope, but I’m not sure exactly what the limitations are because I never use them. I find them too limiting and too unpredictable, and they prevent a tool from caching. As for why some keywords work in an expression and not a script, it’s first because the tool already provides its own context, and so the API provides some shortcuts, like ‘time’ instead of needing the longer ‘comp.CurrentTime’ that is required by the external Lua interpreter. Likewise, you don’t need to prefix ‘comp.’ to tool names when used in an expression or in the console because that context is implicit. In a script, though, the interpreter needs it to understand what object you’re addressing.
You might get some benefit from installing the ClassBrowser from Reactor, which pulls data directly from the libraries to provide hints about available members and methods. It’s not full documentation, but it can be very helpful.
Bryan,
Thanks for your feedback and useful hints, especially for reference to the forum.
I also found some answers after reading fusion scripting manual more carefully.
Basically all the externally controllable variables in the particular tool are just (internal) input objects with the set of methods to work with them and basic ones are to set and get their values. Now it all clear.
Also experimenting with in-tool simple scripts I also found that they give unpredictable results after changing tool parameters after frame sequence was rendered and cache is created.
So to get to closer to my idea to create central automation tool for the entire composition which does per frame automation in different composition tools from single control center during playback and rendering I probably need to create some new tool which could hold script itself and execute it every frame during playback or render process but not sure how this could be done so that it would work reliably and in predictable manner. Tried custom tool but it is not very useful in this respect. Probably need to create some new custom tool ( fuse ?) to do that but not sure if this is feasible.
Regards.