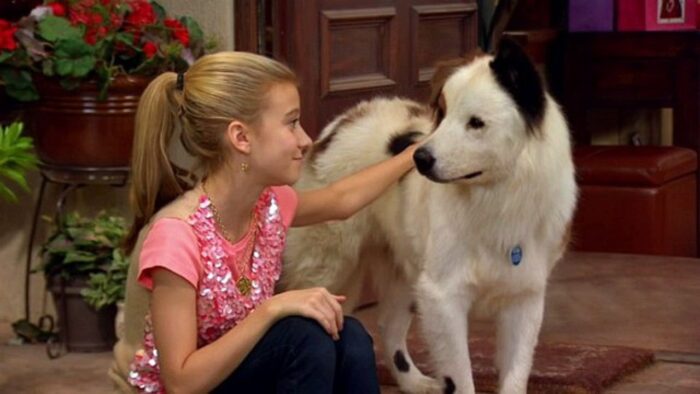
The first year of my time at Muse VFX was spent almost exclusively on the Disney’s Dog With a Blog. For those not familiar with the show, it’s about a talking dog that (surprise!) has a blog. In a half-hour sitcom, there were typically 30 – 40 shots of Stan with a CG face. By the time Season 3 came around, we had a pretty bullet-proof and fast pipeline in place.
I won’t give you all of the pieces here, but I would like to describe one particular technique that made many other things possible.
PFTrack allows you to use a model of the object you wish to track as a reference in the program. In a Geometry Track node, you import your model, usually in obj format, align it to the object you wish to capture motion from, and track away. PFTrack detects the motion of the pixels beneath each vertex and matches the geometry’s motion to the video source’s.
There is another mode in the Geometry Track node, though. Instead of moving the object, you can tell it to move the camera. By design, this was meant to allow you to model an environment, then use that as reference for the camera’s motion through that environment. That isn’t the only way to use it, though. For DWAB, we always tracked a moving camera around a stationary dog’s head, even though clearly the dog was the one moving.
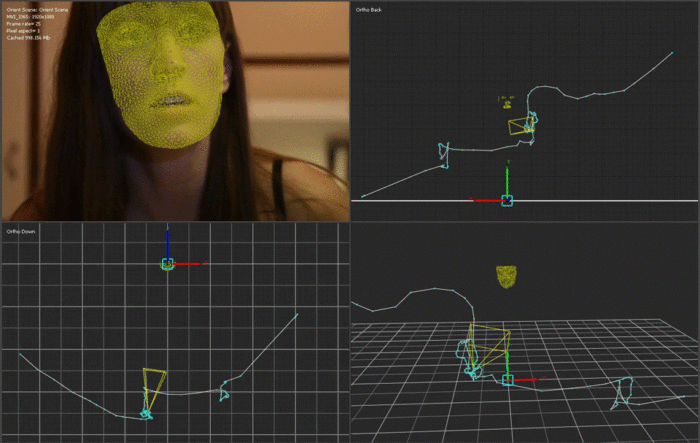
By doing things this way, our animator could work on a stationary model from whichever angle she pleased and never have to deal with the dog walking out of her viewport, as would happen if we’d provided a moving head.
In addition, the animator could, theoretically, begin working even before the tracking was done. In practice, our tracker was so fast that it never happened, but since the only thing coming from tracking was a camera, it could be easily added after the fact. As a side benefit, it was never necessary to get a separate track for the camera—it didn’t matter if the camera was moving or stationary, as long as it didn’t move so much as to affect the lighting direction, which is rare in a multi-camera sitcom.
In order to create the illusion that Stan’s head was turning in relation to stationary lights, we parented the HDRi (High Dynamic Range image) and lights under the camera. In short, we changed the frame of reference from world-referenced to character-referenced. The character stays still, and the world moves around him. In order to position the lights correctly, we placed Stan’s face in the center of a sphere upon which we projected the panoramic HDRi that our on-set supervisor provided to us. By viewing the panorama through the camera, we could align it to the footage. Any necessary additional lights were then placed in relation to the HDRi.
HDRlabs’ sIBL GUI software makes importing the HDRi a breeze, and it can even help to set traditional lights that match the intensity, location and color of the lights captured in the panorama. Since the dog’s head was always at the origin, the HDRi reflection and feedback spheres always came in ready to orient—at most, the only thing we ever needed to adjust was the HDRi rig’s scale.
On the compositing side, the moving camera approach provided another benefit in the form of a World Position pass that was static relative to the dog’s head. We were able to use Fusion’s VolumeMask node to easily make selections of the dog’s head that never slipped when he turned his head. An Object Position or UV pass can accomplish the same thing, of course, but since each object carries its own coordinate system with it, it can be more difficult to manage different pieces of geometry.
Suppose, for instance, that you’re adding horns and spines to a character, and each protuberance is a distinct piece of geometry. If you select the base of a horn with a VolumeMask operating on an Object Postion pass, you will also get masks on all of the other pieces at the same object coordinates. You would then have to intersect your mask with, for instance, a MultiMatte element in order to isolate the area on just the horn you want. If you select the horn using a World Position pass, you will get only the volume of space you want, without having to worry about those coordinates showing up elsewhere in the world. On the other hand, World Position does not handle deformation. Sometimes using the UVs is a good idea for deforming characters. One problem we had using the World Position approach for DWAB was if the dog made a very large facial expression, sometimes his jaw or his brows would move out of the selected volume.
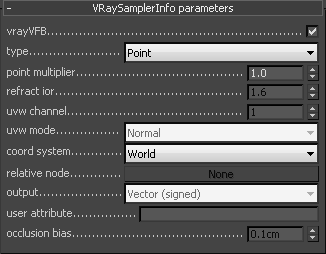
To set up a World Position, Object Postion or UV pass with VRay for 3DS Max, add the render element VRaySamplerInfo. Set the coordinate system to world, object, or UV. In the resulting image buffer, the value of each color channel—red, green, blue—represents the distance of that pixel from the origin in whatever unit your scene is set to (for the UV pass, the value is typically a percentage of the UV coordinate space rather than a physical unit.) Since we were usually dealing with a dog’s head, which is much less than 1.3 kilometers wide, we set the point multiplier to 0.01. A 16-bit buffer then yields a sphere with a diameter of about 13 meters, since we model in centimeters, accurate to within 2 μm.
If you use World Position, you will also want to make sure that every pixel in your render has a coordinate. We use a large, matte sphere with inward-facing normals as a boundary on our scene so that any ray that is cast from the camera intersects a polygon, even if that poly is invisible. Otherwise, every background pixel will be black: 0,0,0. That causes problems since the geometry is actually at 0,0,0, and attempting to select it will also select the entire background. It’s a good idea to do something similar if you are attempting to render Z-depth in order to avoid infinite values in that buffer.
We used MultiMatte elements to isolate a few troublesome spots on Stan’s face: his nose, eye patch fur, eyes, teeth, gums, and tongue. Combining those with VolumeMasks and the standard complement of CG render passes in a ready-made template composite allowed us to very quickly integrate the CG face with the live-action dog and turn over more than 800 VFX shots for season 3 of Dog With a Blog. That pipeline is now serving us equally well as we perform much more challenging face replacements for the upcoming season of From Dusk Till Dawn.