Getting Started in Blackmagic Fusion
These articles are mostly based on Fusion 8.2 build 2 running on Windows 7 with an nVidia GPU. There are some slight differences in the interface between Fusion 8 and previous versions. I will do my best to highlight them as they come up throughout this series. For the first couple of lessons I was using Fusion 7, though, so some of the screenshots will look a little different from your interface, regardless of which version you are using.
A note for Mac users: As is typical with most software, the Windows Control key is Mac’s Command key. As I am sure you know that already, I won’t continue to insult your intelligence by pointing it out every three paragraphs.
This lesson covers importing footage into Fusion, converting it to linear color, viewing and playing it, and exporting it back out in the file format of your choice. Where Fusion differs greatly from Nuke and After Effects, I will make note of it. For more thorough details on the software and its tools, please consult the Manual and the Tool Reference documents, which are probably the most valuable contributions Blackmagic has made to Fusion so far!
The Interface, Briefly
We’ll go into more detail about the Interface in Chapter 3. For now, we’ll just look at it in very broad strokes.
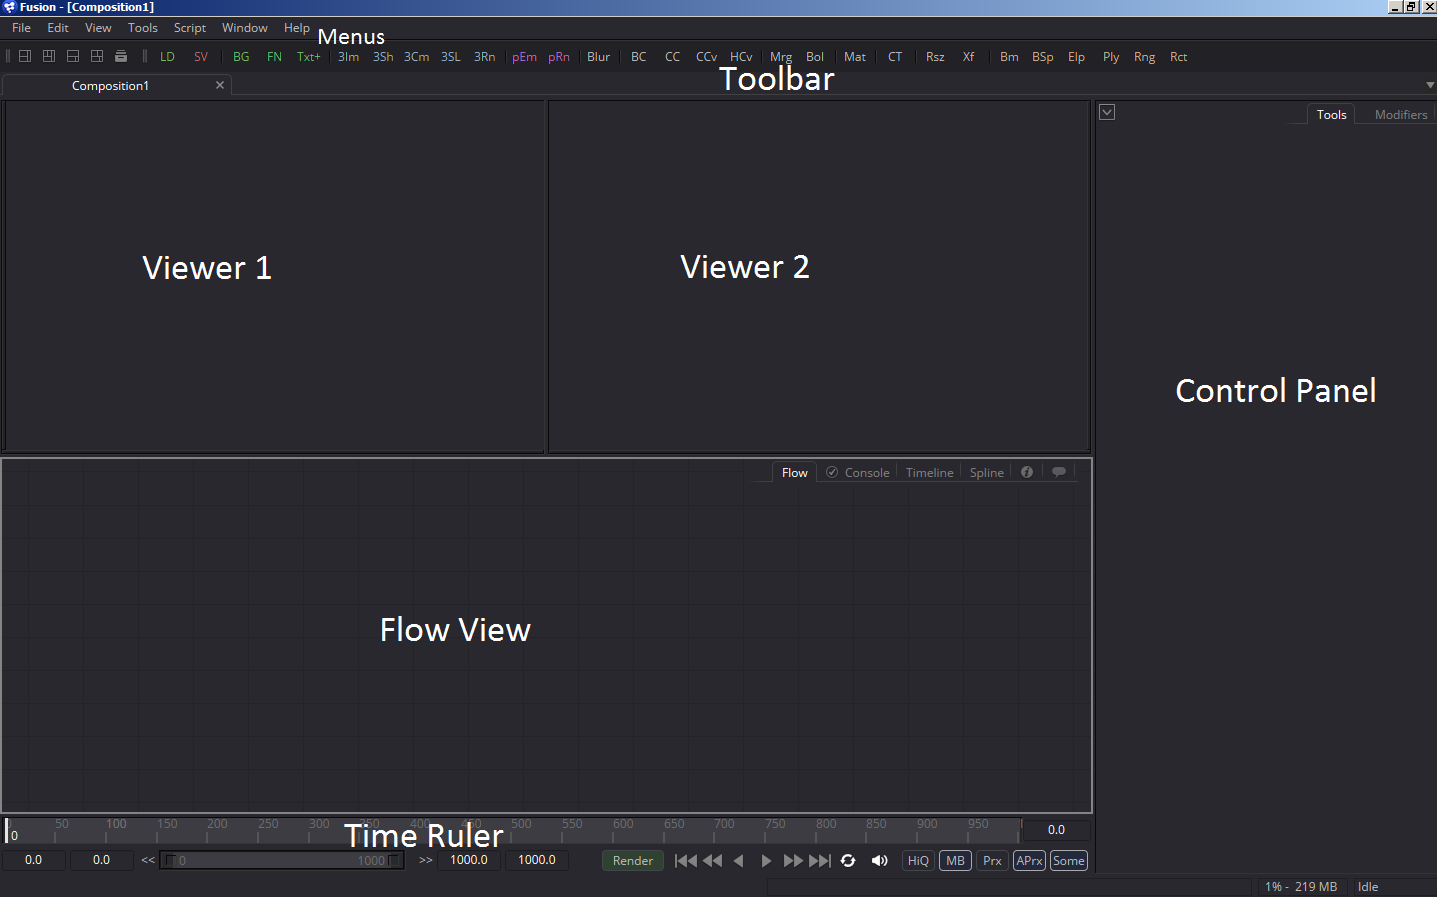
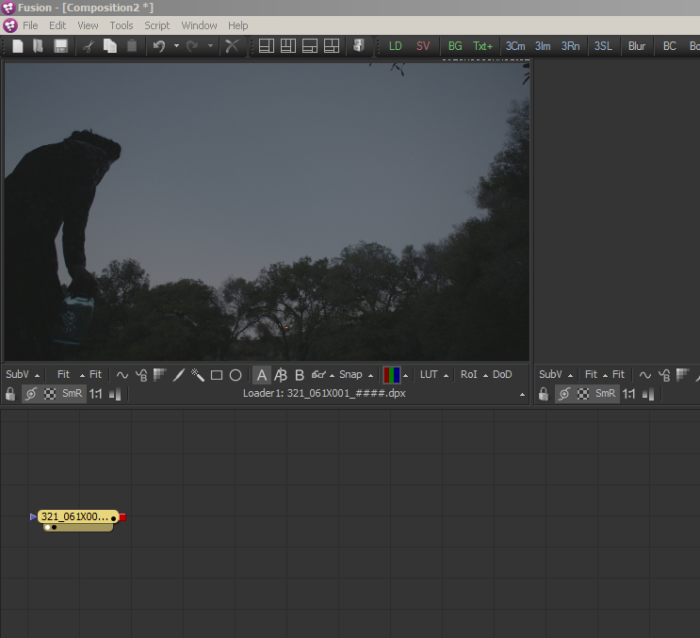
The above image shows the divisions between the major work areas. The Menus work just like most other software. The Toolbar has a handful of layout buttons and shortcuts for a variety of commonly-used tools. In Fusion 7 and earlier it also has buttons for Load, Save, Undo, Redo, Copy, Cut, Paste, and Delete.
The Viewers are where you will display your footage. They are independent and can show different images and have different zoom levels, but they are time-locked to one another, so they’ll always show the same frame.
The Flow View is where the Tools used to build the composite are represented visually in a flow-chart-like representation. The Control Panel displays the settings for Tools that are selected in the Flow View.
The Time Ruler controls the in- and out-points of the composite, the current displayed frame, the working time range, and has the typical playback controls you might already be familiar with in other video software.
Navigating the 2d Interface
To pan around in any panel except the Time Ruler, hold down the middle-mouse button (MMB) and drag in any direction (though the Control Panel will only go up-and-down). If you do not have a middle-mouse button (or yours, like mine, is difficult to use), you can also hold Ctrl+Shift+Left-mouse button (LMB) and drag.
To zoom, hold both LMB+MMB and drag, or hold Ctrl+MMB and drag. Many users find this awkward, so there’s a way to change the default behavior of the scroll wheel to zoom instead of panning up and down. In Preferences > Global and Default Settings > User Interface, under the heading “Touch Scrolling and Mouse Wheel,” uncheck the box next to “Zoom:” (probably the one labeled “Ctrl”). Save the settings, and now your scroll wheel will zoom in all Views except the ones where scrolling actually makes sense, like the Tools and Console Views.
Fusion works great with a stylus. I use a Wacom Intuos drawing tablet and have assigned MMB to the second button. Holding that button and hovering over the surface pans, while holding the button and drawing on the surface zooms.
Loading Footage
When you open Fusion, it automatically creates a new blank Composition (comp, for short). If for some reason the default comp does not appear, File > New (Ctrl+N) will create it.
The first step in a typical project is to import some footage or images to work on. In most software, you would use the Import Footage command in the File menu. If you go that route, however, Fusion will create a new composition with the chosen footage as its filename. Then, when you use File > Import to get a second element to combine with the first, Fusion will again create a new comp for it instead of importing it to the existing comp. While you could copy-and-paste the Loader nodes from these comps into your working comp, using the Import method is not the most efficient way to bring footage into your workspace.
Every video or image you work with in Fusion is controlled by a Loader node, which is equivalent to Nuke’s Read node. When you use File > Import, the new composition is created with a Loader already in place. If you need to make your own, though, there are four ways to do it. First, at the top of your screen, there is a toolbar with a number of buttons with two- or three-letter codes. The leftmost says “LD.” That’s the Loader. Click it, and you will get a file browser you can use to find your footage.

You can also drag the button to the Flow View in order to place it exactly where you want it instead of having it appear at a default location.
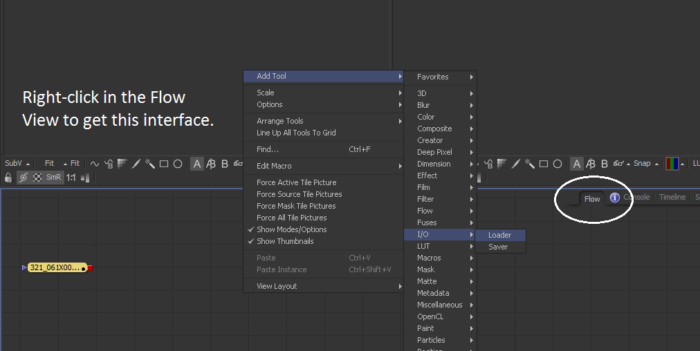
The second method is to right-click in the Flow View and navigate to Add Tool > I/O > Loader, or use the menu bar’s Tool menu > I/O > Loader.
The third method is to click in the Flow View to make it the active window and type Ctrl+Space to bring up the Add Tool dialogue, just like hitting Tab in Nuke. Then start typing “loader,” and the dialogue will filter the available tools to display the one you want. Highlight Loader in the window and click OK, or simply hit the Enter key. This method is the quickest way to get a tool whose name you already know. The right-click context menu is the easiest way to browse the available tools when you aren’t sure what you want, or don’t know if it even exists.
The fourth method is to find your footage in your operating system’s browser, and simply drag-and-drop into the Flow View. If you’re importing a sequence, only drag one file—Fusion will automatically detect that it is part of a sequence. If you really only need one frame, hold down Shift before you drop the file. The loader will be configured to use only that frame (although you can still access the entire sequence using the Trim controls).
Fusion does not have hotkeys for tools by default, but you can customize the hotkeys to call for nodes by going to View > Customize Hotkeys… Nuke users can thus make themselves at home by assigning hotkeys to tools themselves.
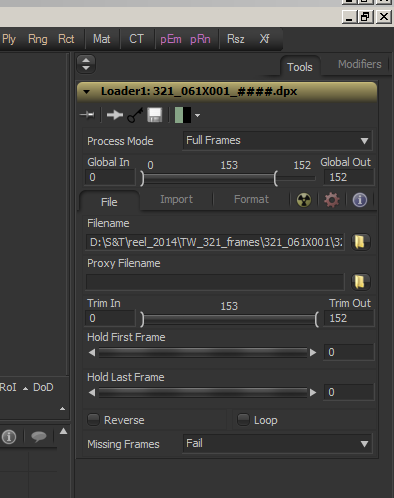
Once your Loader is in the Flow View, the rightmost column should show the node’s controls. I won’t go over all of the controls right now, but here are some important ones you may want to use right away:
The Global In and Global Out controls determine when in your timeline the clip begins and ends. Be careful using this control, though, as Fusion will abort the render if the Saver at the end of the chain cannot get an image at a given frame. You can get around this by using the Hold First Frame control to force Fusion to call for that frame until such time as the clip actually starts.
The Filename field contains a path to the footage or image. Click the folder icon in Fusion 7 or the “Browse” button in Fusion 8 to open a file browser where you can select a clip. Be aware that loading a new clip (or reloading the same clip) will reset the Trim and Global range controls.
Trim In and Trim Out are used to determine the first and last frames of the imported footage. That is, if you have a 3000 frame clip but only need to use frames 88 – 146, set Trim In to 88 and Trim Out to 146. Note that the Global In still controls where in your timeline the clips shows up, so if you have Trim In at 88 and Global In at 0, then frame 88 of your clip will be displayed at frame 0 of your comp. This works like using the “start at” mode for the frame control in Nuke. For After Effects users, you can switch over to the Timeline view to see a graphical representation of the timing of your Loaders. Any changes you make in the Timeline view will automatically update the controls in the control panel. The order in which the nodes appear has nothing to do with layering, though, so don’t confuse this view with AE’s layer-based system.
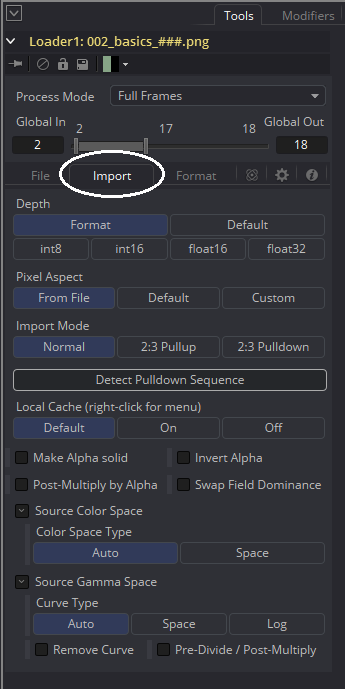 The Import tab stands in for After Effects’ Interpret Footage dialogue. Here you can change the bit depth, the pixel aspect ratio and the color space, among other things. Generally speaking, it’s a good idea to leave this tab alone, as it is easy to overlook settings made here, and there is nothing you can do that cannot be done more explicitly with a separate node. Still, it’s a good idea to be aware of it in case someone has adjusted something and you are trying to troubleshoot it. I know typical practice in Nuke is to set the color space in the Read node, and while Fusion does permit you to do so, the fact that it’s hidden in a secondary tab makes it a good idea to keep the color management outside of the Loader for clarity’s sake.
Depending on what kind of footage your loader is handling, the Format tab may or may not have something in it. If you are using Cineon or DPX files, it’s a good idea to make sure the Bypass Conversion box is checked. I’ll cover this tab in greater detail when we talk about file formats and color management.
Displays and Color Management
Now you have some footage in the flow, and you want to be able to see it. Unlike Nuke, Fusion does not require a Viewer node. By default, there are two Viewers available: The two large, empty boxes above your Flow view. To put your footage into a Viewer, you can drag the node you want to view to the Viewer. Or, if you mouse over the node, two small black dots will appear in its lower-left corner. Clicking in the left-hand dot puts the image in Viewer 1. Clicking in the right-hand dot puts the image in Viewer 2. If you have a second monitor, there will be a third dot that sends the full-screen image to that monitor (this Viewer has no LUT controls, though. If you don’t know what that means, don’t worry about it; I will explain shortly.) If you create a new Viewer with Window > New Image View, yet another dot will appear. In addition, some other display devices like a Blackmagic interface to a broadcast monitor or a VR visor (as of Fusion 9) will also have dots.
Like Nuke, you can simply hit 1 or 2 to put the image in the left or right viewer, respectively. Or 3 to put it into Viewer 3, if there is one.
At this point, we should talk a little bit about color management. This is likely to be foreign territory for a lot of After Effects users because AE makes color management much more difficult than it needs to be! It may also be a weak point for some Nuke users because Nuke handles color conversions more automatically than Fusion does, so artists frequently don’t even realize that the Read is doing a conversion. I won’t get too far into it, as it is a deep topic best saved for a later chapter, but the basics are these: Fusion (for the most part) assumes that the images you are working with have a linear color response: A value of 1 represents twice as much light as a value of 0.5. For various technical reasons, cameras and monitors are not linear devices. In order to view the image the way it was meant to be seen, you need to know two things: What transfer curve is the image using, and what transfer curve does my screen use? Once those two things are known, you can apply some tools to remove the gamma of the image while you work on it, restore it before you save the composite, and apply the right curve to view it on your screen.
Image gamma (Transfer functions):
First, the term “gamma” is imprecise. Few color spaces use a pure power function, but many artists and programs use the word because “optical-electrical transfer function” is a mouthful.
Jpg, tga, png, avi, mov, mp4: If you are using one of these file types, or some similar format intended for viewing on a screen, it is likely that the image is in either sRGB or rec.709 color space. If that is the case, it probably looks just like you would have expected it to right now. Fusion is just passing the pixels from the file to your screen without attempting to interpret them in any fashion, just like AE does in its default configuration. While that’s great for looking at it, it’s not going to be so good for compositing (we’ll explore why later). To turn the sRGB image into a linear one, you need a Gamut tool. Gamut isn’t available on the toolbar, so you’ll have to use the right-click or ctrl+space method to access it. If you use right-click, you’ll find it in the Color folder. If the tool didn’t automatically connect to the Loader, just drag the red square of the loader to the gold triangle on the Gamut to connect them, then put the Gamut tool into the Viewer.
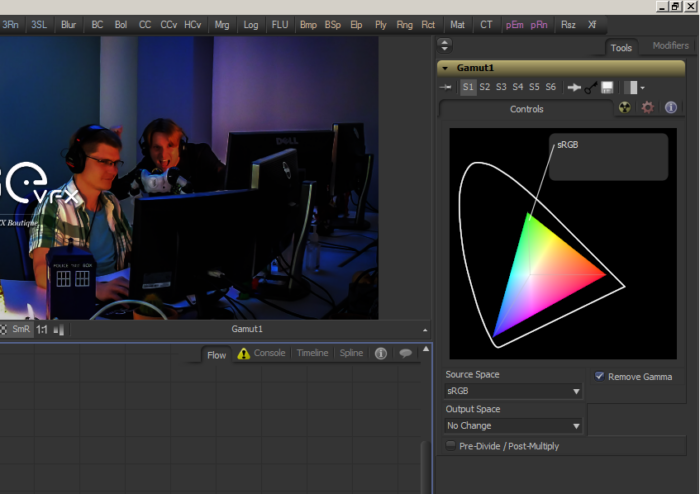
In the Gamut’s controls, select sRGB in the Source Space drop-down. By default, the Remove Gamma checkbox will appear, already ticked. Leave Output Space set to “No Change.” What that does is to tell Fusion that the transfer function of the input is sRGB, and that it should remove that curve and send the image out with no further change. The image is now linear, and it likely looks terrible in your Viewer—too dark and saturated. We’ll fix that in a few moments.
Cin or DPX: If you have footage that came from a scanned film negative or was preprocessed for post-production, it probably uses some kind of logarithmic transfer function. These images usually look milky—desaturated with lifted blacks. Depending on your preferences, the Loader may have automatically given a dpx a default conversion. Check the Format tab to be sure that the Bypass Conversion box is checked. Best practice is to do the conversion in a separate node in order to make it obvious what’s been done. To convert a log plate to linear, use a CineonLog tool. This tool is found in the right-click menu in the Film category. Again, if it did not automatically connect to the Loader, drag the red square of the Loader to the gold triangle of the CineonLog. The default mode converts Log to Lin with a standard Cineon curve (a specification developed by Kodak for scanning film to digital format, Cineon continues to be a useful approximation for many logarithmic capture formats). You can adjust the curve with the controls in this tool, or select from a small number of preset log types provided by standards and camera manufacturers. If you need a more specific color conversion, I will cover LUTs more thoroughly later on.
EXR: EXR is usually assumed to be linear. No further conversion is usually necessary, although it’s easily possible to render to EXR in sRGB mode, in which case you’d use the Gamut tool as described above. An sRGB image that has been interpreted as a linear one usually looks too bright and noisy.
Viewer Gamma:
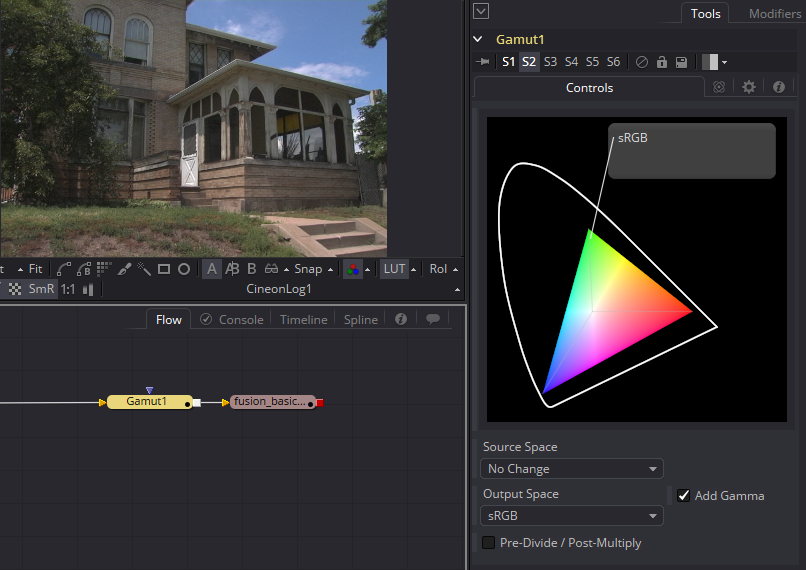
Now that the image has been linearized, it’s time to tell Fusion how to display it on your screen. In the image below, you can see that I have converted my dpx source, shot on an ARRI Alexa, to linear using the ARRI LogC curve in a CineonLog tool:
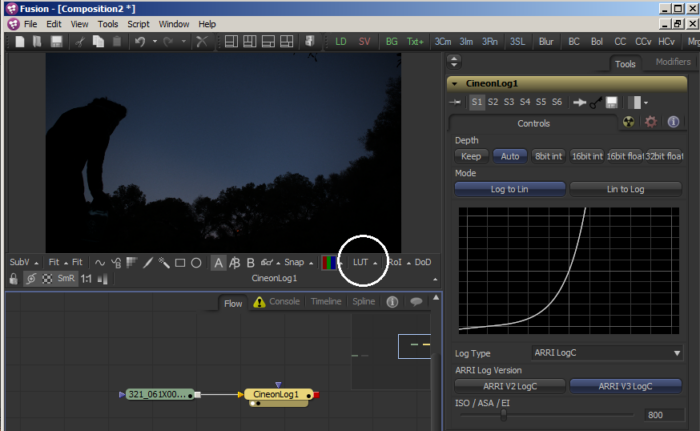
I’ve circled the LUT button, which is used to tell Fusion what kind of monitor I am viewing the picture on. If you aren’t familiar with this concept, LUT stands for LookUp Table, and it’s simply a brightness curve that maps incoming pixels to outgoing brightness values. Once again, we’ll get deeper into that idea later on. For now, just know that by activating this switch and choosing a color space in the pop-up menu (click the little up-arrow next to the LUT button), Fusion’s Viewer will translate the linear pixels back into something we can easily view. In Fusion 7, you can simply choose sRGB and be good to go. Fusion 8, for some reason, removed many of the default LUTs, so you’ll have to do just a little bit of configuration to get the Viewer to work correctly.
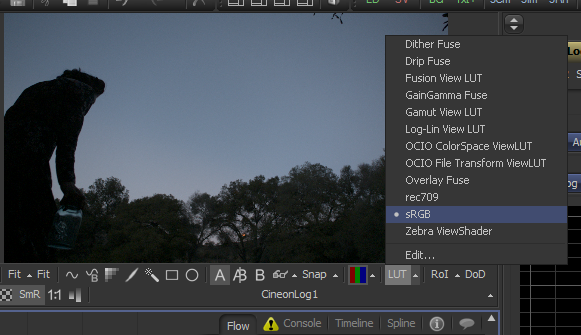 From the pop-up menu, choose the Gamut View LUT, then immediately open the pop-up menu again and choose “Edit…” The dialogue that appears works just like the Gamut node—set the Source to “No Change,” the Output to “sRGB,” and ensure that “Add Gamma” is checked. This time, we’re telling Fusion that the incoming image is linear, and we want to add a correction to turn it into sRGB.
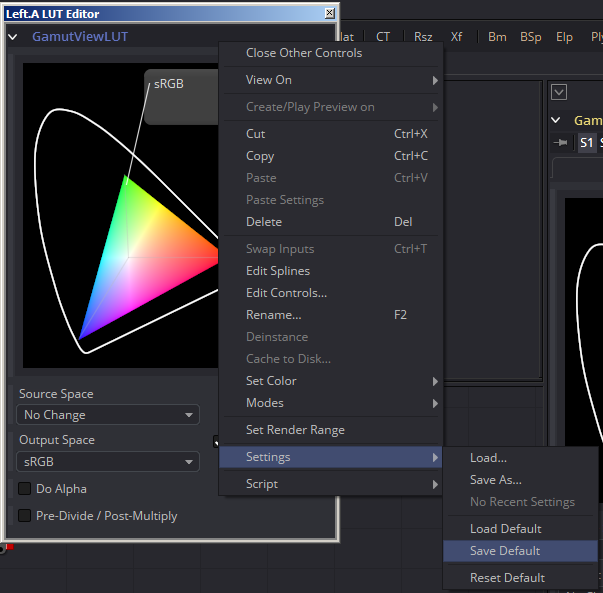 In order to make sure that these settings stick the next time you open Fusion, you need to set them as default. Right-click in the title bar of the control panel—the blue text that says “GamutViewLUT” and choose “Settings > Save Default.” Now the LUT will always use these settings. To make this the default LUT, right-click in the Viewer and again choose “Settings > Save Default.” Now every Viewer will use this LUT.
Phew! That’s a lot of (boring) work just to be sure we’re looking at things correctly, but trust me: this is critical knowledge, and getting it right will only help you. Once again, we’ll go deeper into color spaces and LUTs in a later chapter.
Playback and the Time Ruler
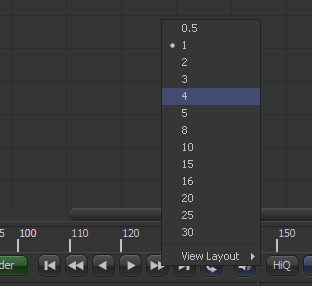 Below the Flow View is the Time Ruler, playback controls, and a few other buttons. The playback controls are fairly standard for software of this kind: Play forward and back, step forward and back, go to in and out points, and a loop control button. If you right-click on the play buttons, you get a context menu that lets you select the step frame value.
The hotkeys for stepping forward and back on the Time Ruler are the inconveniently-located [ and ] (Someday maybe we’ll standardize the playback controls for all video and film software). Holding Alt while pressing these keys will move the playhead to the previous or next keyframe of the currently selected tool(s), if any such keyframes exist.
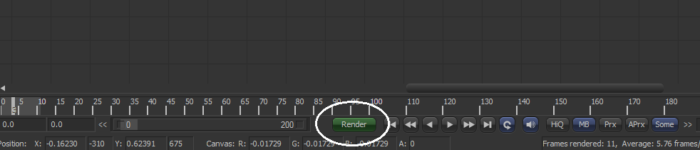
To set the Time Ruler ranges, the numeric fields at the left and right extremes are the easiest way. In this image, I have marked the Global Range with hollow white arrows, the Render and Playback Range with solid white arrows, and the current frame with red arrows:

As you can see, the light grey bar represents the Render Range, and the dark grey bar represents the Timeline Range. The playhead is indicated by an even lighter grey line, and any keyframes on the currently selected tool will show up as green lines. The << and >> icons will trim the in or out, respectively, of the Playback Range to the location of the playhead. You can quickly set the Playback Range to the duration of a Loader by dragging that Loader onto the Time Ruler. Ctrl+dragging a Loader will set the Global Range.
You can zoom in and out on the Time Ruler by dragging the small boxes at either end of the range bar to the left of the Render button. Sometimes setting the Global Range by Ctrl+dragging a Loader doesn’t set the zoom level to encompass the entire new range.
Output
Writing the information out once your composite is complete is much the same as loading it to begin with. First, you need to add whatever color space adjustment your finished image needs. Usually, you want to simply reverse whatever you did to make the image linear. A CineonLog tool in Lin to Log mode for dpx, or a Gamut tool with the Source Space set to No Change and the Output Space set to sRGB or rec709.
Next, you need a tool that will write the image to disk. For this we use the Saver, which is equivalent to Nuke’s Write node. On the toolbar, it’s the red “SV” button.
There are some quirks in the Saver node. First, if you are rendering to discrete frames (recommended), Fusion will put a four-digit frame number right before the last period in the filename. If you render out foo.jpg, your actual filenames will be foo0001.jpg, foo0002.jpg, and so on. So a filename of foo_.jpg or foo..jpg is better. If you want to specify the frame padding, Fusion will interpret any numbers or # signs right before the last period as the numbering pattern. So foo.000000.jpg, foo.123456.jpg, and foo.######.jpg will all result in six-digit frame numbers. The starting frame number is determined by the Time Ruler’s settings, not by any numbers you put in the filename field.
Second, if you change the Output Format in the drop-down box, but do not change the extension that appears in the Filename field, the rendered frames will be in the specified format but have the wrong file extension. On the other hand, if you change the extension in the Filename field, the Output Format box will update automatically.
Third, if you are running Windows and wish to output a Quicktime video file, you will need to have Quicktime Essentials installed (Fusion 8 and earlier only. Fusion 9 introduced its own QT encoders, but some of the legacy codecs are no longer available). There was a recent security warning about a vulnerability in Quicktime, so it is currently recommended to install only the Essentials portion of the software, not the Player or web plug-ins. Again, though, Fusion doesn’t handle video files very well, so an image sequence is recommended. You can convert the sequence to a video format of your choice using software dedicated to that task, such as FFMPEG.
Once your Saver is configured, you can render the comp with the green Render button by the playback controls:
Unlike Nuke, Fusion will always render every Saver that is not passed through (disabled). If you have 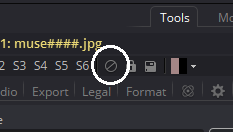 multiple Savers in your comp and only want to render one, you have to disable all the others. Ctrl-P is the hotkey for disabling a selected node, or you can click this button (it has a different icon in Fusion 7 and earlier, but it’s in the same place):
A few closing thoughts
Fusion gets inefficient very quickly when dealing with multiple video sources. Best practice is to convert any video to frames in order to streamline your work. It’s also not the best at handling audio, but if you do want to link a separate audio file to your comp, first make certain that your playback rate is set correctly in the Preferences, then right-click the audio button to the right of the playback controls. In the Saver, you can add the audio to your rendered output, assuming you render a video format, in the Audio tab. Again, though, it’s usually better to handle audio and video encoding in an editing program such as Premiere or Final Cut.
That about does it for the “ins and outs,” if you’ll pardon the expression, of Blackmagic’s Fusion! In the next chapter we’ll talk about some basic compositing theory and tools.
Updates:
June 9 2017: In response to Ian’s question in the comments, I have added a little bit more information about video formats in the Saver.
Jan 1 2018: Corrected and expanded some information about 2d navigation.
Hi Bryan!
Just wanted you to know that I am following your tuts with great interest since I am new to fusion and compositing in all together. Keep up the good work!
Best regards from Sweden
/Thomas
Thanks! If there’s anything that’s confusing or too shallow, feel free to let me know.
OK – Clarification please. Im also new to Fusion and Im getting to think its just one headache after another and I should be in the Adobe camp. Ive just created a short text intro based on an online tutorial. Great everything works. Like the result and now want to save it – this is when everything goes seriously wrong.
Ive just read your page –
Second, if you change the Output Format in the drop-down box, but do not change the extension that appears in the Filename field, the rendered frames will be in the specified format but have the wrong file extension. On the other hand, if you change the extension in the Filename field, the Output Format box will update automatically.
NO video file available to save on. I have to save as a series of files.
You have to be kidding me.
Thanks
Ian
I assume you’re using Windows and do not have Quicktime installed? Fusion doesn’t have its own Quicktime encoders and relies on an existing Quicktime framework in order to encode video formats. Installing Quicktime should solve your issue. If you are concerned about the reported security vulnerability, you can install only the Quicktime Essentials with the regular QT installer. I forget exactly the steps, but there should be a custom install option where you can disable the Player and web plug-ins.
Standard professional practice is to work only with image sequences—there are several disadvantages to trying to work with video in a compositing program (yes, even AE)—so Fusion has limited capacity to create it. We’re hoping that Fusion 9 will have better video support on Windows and Linux, but so far Blackmagic hasn’t shared any details about what’s in store for the new version.
Personally, I recommend using a utility specifically designed for video, such as FFMPEG or Adobe Media Encoder, to encode image sequences to video when required rather than using a compositor. You get much more control over the process, and the files are usually more efficiently compressed. AME compresses h.264 as much as 20% smaller than After Effects when using the same settings.
Thanks Bryan. There seems to be so much confusion on some many areas of the internet and finding a straight forward answer from yourself was excellent.
I don’t suppose in a future post you could give a pros and cons on file formats when saving a project.
Thanks again.
Ian
I’ve covered a little bit of it with the Anatomy of an Image article. I have been thinking that I should get a little deeper into video formats, though. There are so many video codecs, though, that it’s a little daunting, especially since I don’t actually know all that much about video, so I need to do quite a bit of research.
http://www.bryanray.name/wordpress/anatomy-of-an-image/
The relevant info is about 2/3 of the way down the page, under the heading “File Formats and Compression.”
Is there a way to create a single node which “represents” an entire composition? This would be essentially importing models into a composition, such as a street lamp into a city scene. I know I create a duplicate node to represent subsequent copies of a structure (such as the street lamp), but is it really necessary to copy and paste the entire node structure of the object to begin with? If so, it would clean up the node/flow space tremendously.
You don’t usually need to create copies in order to reuse portions of a comp. A node-based compositor uses a one-to-many paradigm—you can pull as many wires off an output as you need, allowing you to reuse a Loader, a Render3D, or an entire portion of the tree multiple times.
For instance, in your example of copying a street lamp several times, you could make several Transform3D nodes, connect the output of your street lamp geo to each Transform3D’s input, then connect all of the Transforms into a Merge3D. Even though there’s only one copy of the lamp in your flow, you’ll get several in your scene because it’s being added to the Merge3D several times with offsets determined by the Transform3D. Or for something as regular as that’s likely to be, you could just use the Duplicate3D node, which can distribute the lamps evenly in whatever direction you choose and even add a little bit of jitter to their placement so they’re not perfectly uniform.
You also have the option of prerendering an element if it’s too heavy to use multiple times. Then you can replace the input(s) below that Saver with a Loader. Just remember to pass-through (disable) the Saver once the prerender is done so that you don’t keep processing that part of the tree when you don’t need to.
There will be some good examples of using multiple outputs from a 3D scene in the next article. I’ll also try to remember to put in some information about the processes I described above. Whenever I get around to writing it; my new Oculus Rift is super distracting!
Thank you for your quick reply. One of my frequent frustrations with the Duplicate3d node is that it randomly anchors in the rendering field. What I mean by this is that the grab and drag arrows don’t always appear right with the duplicate object, sometimes they’re separated by a hefty distance. This becomes problematic when trying to rotate the object, because it is trying to rotate on an axis that is far removed from the center of the duplicate object.
I’ll look forward to your next article to get a clearer picture of some of the other strategies you mentioned.
Thanks again.
Sorry it took a while to get back to this. I wanted to test my assumptions before I commented, and then it slipped my mind. The Duplicate3D’s transform handle always appears at the location where the first copy would be if the object being duplicated were at world coordinates 0,0,0. I don’t know if that’s a bug or desired behavior, but you’re right: It can be disconcerting.
The promised 3D chapter is coming along, but I found myself distracted by a few other things. Plus, it’s more complex than most of the previous chapters, so it’s taking a lot more effort to put it together.
as this WordPress interface appears not to want to let me have enough words for this comment, i will have to post it in two (or maybe even three!) parts.
Part 1
i am about half way through the chapter and finding it very illuminating. in general, i like the sense that you really know the subject and you are going to talk about some important but tricky or obscure items.
however, i had a pretty hard time trying to follow the viewer gamma section. for one thing, i wonder if Fu9 is different from Fu8 in this matter? for sure it looks like they have removed even more possibilities from the LUT pop-up arrow (why?). i think at least two things would help, at least help me:
TBC
Part 2 (of 2)
1) there need to be more screenshots (especially with arrows, boxes etc, which are really helpful). the screenshots already there are a help, of course, but more sreenshots would make it much quicker or indeed possible to find the settings, buttons etc. i, at least, find the Fusion interface very dark, and the black type on dark grey is horrible to try to read and as far as i know there is no way to change the interface brightness, contrast or hue (unlike blender, which you can turn into a roman candle if you want. colours etc. if there is a way to change the Fusion 9 UI, i would love to know). right now, i am stuck because i cannot see where the Add Gamma box is. it is probably blindingly obvious, but i just can’t see where it is. there is a Remove Gamma box – is that it, but now in reverse?
2) i don’t have any log footage, but no doubt i will (i have a GH5, which can have V-Log LUT) and i would really like to understand log workflow in fusion before i start shooting a lot of footage with log and then find that i cannot process it or it is not the right way to go. therefore, it would be great if you might be able to provide or point to the log footage that you are using so that one can follow along hands-on exactly what you are doing.
Thank you for the very useful comments!
I have the exact same list of viewer LUTs in Fusion 9 as I had in 8, but not as many as were in 7. At work, though, the OCIO LUTs weren’t listed in F9, so I wonder if perhaps both versions are looking in the same place for Viewer LUTs, and 9 is seeing the ones that installed with 8. In any case, as long as you have access to the Gamut View and the Log-Lin LUTs, you should have everything you need for most projects.
If you’re brave, I believe it’s possible to hack the appearance. C:\Program Files\Blackmagic Design\Fusion 9\Skins
In that folder, you’ll find a file called Fusion.fuskin. Make a copy of it and change the copy’s extension to .zip. You can then explore it and experiment with changing things. The Fusion.skin file in there is a plaintext file with what appears to be some kind of style sheet. Here’s a post at We Suck Less talking about hacking the Fusion skin, along with a downloadable one:
https://www.steakunderwater.com/wesuckless/viewtopic.php?f=16&t=34
Be aware that the low-contrast, dark grey theme was chosen in order to maximize the user’s perception of color in their images. If you tint the interface at all, you risk altering the way you see your composite and making non-optimal choices. Assuming, of course, that your display is reasonably well calibrated.
Okay, next item…
The Remove or Add Gamma box only appears if you have chosen a color space, such as sRGB or ACES in either the Source or Output Space control, respectively. If you’re dealing with the Viewer LUT, remember that you want to go *from* linear *to* sRGB for your display. So Source Space should be “No Change,” which hides the Remove Gamma, and Output Space is “sRGB,” which unhides the Add Gamma.
From what I’m reading the V-Log response is very similar to Cineon, so all you would need is the CineonLog tool with its default settings. You can change them if you need a slightly different gamma or reference levels; just remember to use another CineonLog at the end of your comp with *exactly* the same settings, except for the Lin to Log button to put the image back into the same color space it came from.
I can’t provide the plate that I used as an example because it belongs to MTV, and my contract doesn’t permit me to share raw assets. I’ll try to get clearance for some good example assets that I can share for the next draft. It’s been hinted to me that I might be able to borrow a Blackmagic camera for publicity purposes.
Once again, thank you for your comments; they’ll really help me in the next draft!
thank you so much for such a detailed reply. i will study and follow up everything you have mentioned and post back here with my results.
the raison d’etre behind the dark interface is a good idea – but i simply cannot read black text on very dark grey! here is an example: https://www.screencast.com/t/C3afCFgjP (i would post an image in this message but i have not yet discovered how to do that in WP).
i do not normally play devil’s advocate, but the tool abbreviations are shown in different colours at the top, so why can’t some of the rubric in the right-hand control panel do likewise – or at least be white text or light grey?! this is a question for blackmagic i know and i shall try to the find the best way of asking them about this matter.
anyway, i shall attempt, with the help of your comprehensive explanation, to hunt down where the black text colour is controlled from. if i cannot change it i shall just have to memorise those sections (and dream of blender).
i do have a calibrated monitor (dell 2415Q) which i shall be using for compositing (and grading, when i get there).
i understand regarding footage clearance. it is a pity that so much now is so locked down – ironically this is both the age of Wikileaks (not to mention White House leaks) and the iron grip of the NDA.
Oh! That has to be some kind of display bug. Or maybe a conflict with an OS-level type control. All of that type should be white, like in my screen shots. Maybe double-check that you have the latest driver for your video card.
Hi Bryan,
Totally loving these articles, really indispensable for anyone trying to gain a better understanding of Fusion. But it’d be even more awesome if you could at some point consider going even deeper into the color managing side of things since it’s really at the very core of all compositing work – especially in a package such as Fusion that doesn’t take care of all that stuff for you under the hood.
I’d be especially interested in learning how to operate the OCIO tools properly since proper view transforms emulating film-alike behavior are on the rise at least in the 3d world. Blender, for instance, now ships with the Filmic Blender extension which is basically an OCIO configuration and I’ve already seen people load the .ocio file up in Fusion and apply some of the LUTs successfully.
But this begs the question: What is really going on under the hood when you do that? Does this mean that your footage is no longer linear? And if so, should you apply your BC/CC/CCv tools before the transform? I would really appreciate your insight here since it’s not easy to find nor grasp information on this matter and you’re only asking for trouble down the line if you skip this step without proper comprehension.
Thanks for the compliments! To be honest, I need to do a lot more learning on the color management side of things before I try to speak with any authority on it. Based on my experience, though, the production usually supplies whatever LUT or CDL the on-set DIT was using for review. This LUT typically converts a log image to 709 with whatever color choices the DIT made at that time, so you have to feed it a log image to get the correct results. The flows we use at Muse usually look like this:
Loader (ArriLogC) -> LogToLin -> compositing -> LinToLog (ArriLogC) -> Saver -> FileLUT -> Gamut (709 to sRGB)
To get the most accurate idea of what the client is actually going to see when they load up the final deliverable, we view that last Gamut node. Things can get messier, though, because sometimes the client has a standard log-to-709 LUT for all shots and a separate CDL per shot for the grade. And not everyone uses the same procedure regarding whether the CDL or the LUT goes first. Regardless of what procedure your client is using, though, they probably aren’t going from linear to sRGB (although I don’t know, maybe the Blender people are?), so you will almost never be able to simply load the supplied LUT in the Viewer. You can certainly create a LUT that will perform all three transformations, but it will probably not be a “set it and forget it” process.
And all of this might go out the window when the actual colorist gets involved because that CDL is just a starting point, not the final look. As a compositor, you need to be sure that your image holds up regardless of what additional transforms the client might make. That means looking at the image with a variety of gain and gamma settings to be sure that colors that are supposed to be close together do not separate and that the brightness hierarchy is preserved. The Waveform SubView can be very useful to get a more objective idea of where your levels actually are.
That’s all based on a pipeline in which there is an external colorist who is going to be making the look decisions, of course. If you’re working on look dev or producing your own material and you want to output graded images from Fusion, then you will need to make the decision of what your target color space is, set your LUTS to achieve that, and put it all before the Saver. Vito La Manna of Con-Fusion does that kind of thing frequently. I was just asking him some questions about creative LUTs the other day, in fact.
I’ll continue to read about color, and maybe I’ll eventually write some articles on the subject. I’ve had some ACES documentation on the backburner for months.
Thanks for the swift and detailed response! I was talking more in terms of a smaller scale pipeline (which I probably articulated extremely poorly), looking at it from pretty much a one-man shop’s point of view where the footage you’re working with is mainly just EXRs you’ve rendered out yourself. One should always provide enough context before delving into these broad, multifaceted questions, so my bad!
Anyways, there’s this lengthy thread on Blender Stackexchange (could be a worthy read even if Blender is not exactly your shtick) about the new view transform that, from what I’ve been able to gather, handles the scene referred HDR data more eloquently than the basic sRGB EOTF. It’s not just about preserving detail in the highlight areas, it also desaturates colors as they grow in intensity, emulating film-alike behavior.
It’s OCIO-based so you can harness all its finesse in Fusion as well, it’s just the workflow I’m a tad confused about. I’ve been reading up on color management lately, scouring various forums, and a lot of folks seem to go out of their way to hammer home the importance of the linear workflow. So I’m just trying to make sure I don’t stray from that path lightly nor unintentionally… Is it true, btw, that the math ”breaks” if you color correct or otherwise process your material once you’ve applied a gamma curve to it?
To add to the confusion, here’s a quote from the Filmic Blender GitHub page (could very well apply to Fusion as well): ”For grading, it is highly encouraged to use the ASC CDL node, as it operates on scene referred imagery perfectly well. Do not use the Lift, Gamma, Gain default as it is strictly a display referred formula and will break on scene referred imagery. Instead, change the drop down to ASC CDL and use the Slope, Offset, and Power controls to perform grading.”
I did a little reading last night on this topic, and I _think_ I have a better understanding of what you’re talking about, but my education is still incomplete. Do you have a link to the StackExchange conversation?
The advantage you have when you’re not part of a larger pipeline is that you can really lean on “If it looks right, it _is_ right.” You don’t have a colorist coming along later and doing something strange that breaks your composite. It’s probably still a good idea to implement some best practices, though, which could help to alleviate some of the pain of expanding your operation if you need to do so.
Here’s the best and clearest article I have found so far: http://shootdatapost.com/blog/2014/5/16/aces-in-10-minutes
Translating some of that into what we’re talking about here, I think that Filmic Blender is serving as part of the Input Device Transform—it creates a scene referred linear image with response properties similar to what you’d get with a real camera. As long as what you end up with is something similar to a linear scene-referred image, such as what you’d get with a real camera _after_ the IDT, then you’ll be in the correct color space for accurate compositing.
As for what happens after that, you have two different kinds of transforms you might do: Color corrections as part of the composite—that is, making things look as though they were all shot together—and creative grading to get a desired “look.” The latter is what you would apply to the entire shot with an OCIO node. I’m still a little unclear if the Filmic Blender View LUT would convert from 709 to the look or from linear. It should be easy to find out though by simply applying it to your shot and seeing if the result looks similar to what Blender shows you.
—
No, the color correction doesn’t “break” if you do it in a gamma corrected space, but the transforms do behave a little differently. Fusion’s CC node was actually designed to work in Rec601, I think. You’ll see that if you try to use the Ranges tab—you have to really crank things downward to isolate useful zones. We’ve got a set of macros that sandwich certain controls between two conversion nodes for better results. CC and LumaKey are the ones I’ve noticed benefit the most from being in a gamma-corrected space. Our fire and explosions guy says that glows work better in sRGB, too.
The place to watch for trouble is highlights across curved surfaces. Any problems are going to be _super_ subtle, but if you’re working on a car commercial you may well need to be that detailed.
I don’t know what’s going on in Blender, but in most contexts Slope is mathematically equivalent to Gain, Power is technically the inverse of Gamma, but Gamma is itself frequently inverted to make it more intuitive. Fusion’s Gamma controls are actually Power controls, as they make the image brighter as the number rises. Gamma’s confusing. I’m not sure if Offset in this context is the same as Fusion’s Lift or Brightness. It could be either, but it’s probably Lift. It’s possible that the default Grade module in Blender is internally normalizing and linearizing before performing its operations, and using it on an image that is already linear doubles that transform, giving inaccurate results. But that’s purely conjecture.
Did I help or just add more confusion?
I’m most definitely less confused now, so thanks for taking the time to shed some light on these issues!
Here’s the Blender StackExchange thread:
https://blender.stackexchange.com/questions/46825/render-with-a-wider-dynamic-range-in-cycles-to-produce-photorealistic-looking-im/46940#46940
And the Filmic Blender GitHub page (includes a short summary):
https://github.com/sobotka/filmic-blender
The Filmic Blender in practice consists of two parts, a view transform and a look transform, both of which provide you with several options. As for the view transform, I’ll quote the GitHub page again:
1. sRGB EOTF. This is an accurate version of the sRGB transfer function. This is identical to what imagers would use as the “Default” View transform in Blender proper. Should be avoided at all costs for CGI work. Useful in some edge cases.
2. Non-Colour Data. This is a view useful for evaluating a data format. Do not expect to see perceptual values however, as it is literally data dumped directly to the screen. Use this transform on your buffer, via the UV Image Viewer Properties panel, if your buffer represents data and not colour information. This will keep it out of the OpenColorIO transformation pipeline chain and leave it as data.
3. Linear Raw. This is a colour managed linearized version of your data. For all intents an purposes, will look identical to Non-Colour Data, but applied to colour based data such as an image.
4. Filmic Log Encoding Base. This is the workhorse View for all of your rendering work. Setting it in the View will result in a log encoded appearance, which will look exceptionally low contrast. Use this if you want to adjust the image for grading using another tool such as Resolve, with no additional modifications. Save to a high bit depth display referred format such as 16 bit TIFF. This basic view is designed to be coupled with one of the contrast looks.
So based on the above, the option #4 is your best bet most of the time. However, if your shot requires compositing, you’d probably be better off exporting your renders as EXR sequences, in which case the Filmic transformations do not get burned/permanently mapped onto the renders (as the would with display referred 16 bit TIFFs).
So in Fusion, running an EXR sequence through the OCIO Colorspace node (with the Filmic Blender’s config.ocio loaded up and the Source Space set to ”Linear” and the Output Space set to “Filmic Log Encoding”) you get the exact same result as switching the view transform to ”Filmic Log Encoding” in Blender. Now, the question is, should I place my color correcting etc. nodes _after_ the OCIO Colorspace node?
The second part of Filmic Blender is basically just a handful of .spi1d LUTs which yield the exact same look in Fusion if you load them up in the OCIO File Transform node placed after the OCIO Colorspace node.
So replicating the look in Fusion hasn’t really been the problem, but rather figuring out where to perform the additional color correction/grading so that you don’t end up harming your material needlessly.
—
Funny you should mention that glow-alike things tend to work better (well, ”better” being a very subjective conclusion, for sure) in a gamma corrected space since that’s exactly why I asked about it as I’d noticed the same thing. I saw a forum thread somewhere claiming it’s got something to do with how the ”add” blend mode behaves in different spaces.
Generally speaking, would love to learn more about all kinds of best practices regarding compositing to which end this set of articles has been a great resource (I’ve also watched loads of Vito’s videos) and I’ll be keeping my eye out for new posts, too. If you ever decide to wrap this up as a book, I’ll be the first one to place an order.
Quoting Ilkka: “Now, the question is, should I place my color correcting etc. nodes _after_ the OCIO Colorspace node?”
Almost certainly not. The Colorspace node is the very last thing in the chain—if it goes in your Flow at all, it should be either right before the Saver (if you want the LUT baked into your deliverable) or right after (if you are only using it for reference to what the shot will look like after a color session in Resolve or something similar). If that last is the case, you could even load it as a Viewer LUT, if you have the OCIOColorSpace ViewLUT available. I still need to check a clean install on a fresh system to see if Fusion 9 still has that LUT.
The end goal is, in fact, a book! (And probably an ebook, as well.) I should have the first draft finished by the end of the year. Editing will take a few months, and I hope to have the finished product ready sometime in the middle of next year.
re “To zoom, (1) hold both LMB+RMB and drag, or (2) use your scroll wheel.” – i wonder if this is different in Fusion 9 or peculiar to my system (Win 10), but neither of these instructions work for me.
1) in order to zoom, i have to use Control + MMB/scroll wheel. i wish it did work with just scroll wheel to zoom, which is what so many other apps do. maybe there is a setting somewhere in preferences or kbd shortcuts so that this could be changed – however, if there is such a kbd shortcuts section in the UI, i have not discovered it. i can see from Fusion forums (eg here: https://forum.blackmagicdesign.com/viewtopic.php?f=22&t=46541) that there may be a way of changing kbd shortcuts using scripts. having no easy way of assigning kbd shortcuts does seem like a major omission, if this is indeed the case. i am used to blender, in which you can re-assign just about anything to a key or group of keys.
2) “hold both LMB+RMB and drag” doesn’t work for me at all. i have tried adding various modifiers, but it makes no difference, however, LMB + MMB does work, but as others in Fusion forums have pointed out, it is incredibly awkward.
First, LMB+RMB was a typo. That should have been LMB+MMB, as you discovered. Thanks for pointing it out!
Keyboard shortcuts can be changed using View > Customize Hotkeys…. It’s a little puzzling how to use it, but it’s there. One of these days I’ll write a tutorial about using the Hotkey Manager. I just need to figure out what all the different contexts mean.
There currently are limited ways to change the behavior of the mouse. To set the scroll wheel to zoom instead of scroll up and down (a ridiculous default, in my opinion): Preferences > User Interface, then in the section at the bottom titled “Touch Scrolling and Mouse Wheel”, make sure all of the boxes next to “Zoom:” are unchecked. Now scrolling with your mouse wheel will zoom instead of panning. I think that was added in Fusion 8; I don’t recall having seen it before.
I’d love to be able to change my mouse to work the same as it does in my 3d software, but so far the developers have resisted the notion for some reason. It’s been requested many times. The existing control scheme does work very nicely with a tablet, though—it’s very quick and easy.
Hello
Thanks for your articles, there are really great.
Like every “commenter” I have some questions :
About the Color Management …. Is it the same to use the Gamut Tool or to use the Color Space /Gamma Space parameters of the Loader/Saver Tool ?
I understand that the working Gamma of Fusion is 1 (Linear), but what is the working Color Space (a.k.a. Gamut).
I know well the Color Management in resolve, but i’m little bit lost in Fusion ….
And nothing seems to be taken care of , by the Fusion connected clip Command from Resolve ….
Thanks again
Yes, the color space options in the Loader work identically to the Gamut and/or CineonLog tool, depending on which is needed. As stated in the article, though, I prefer to do color management explicitly in the Flow so that everything is clear at a glance.
So long as your image is in a floating point format, Fusion itself has an effectively unlimited gamut. It uses a “pure” RGB color model in which pixels can have any value, including negatives and many orders of magnitude above 1.0 (superwhite). That is why it is important to set up the Viewer LUT in order to remap the values back into sRGB space (or Rec.709 or 2020 if you’re using a broadcast monitor) for viewing. It is the therefore the LUT that creates a “working color space,” although the operations performed on the pixels ignore any gamut considerations.
If your image is in an integer format, int8 or int16, then the gamut is the strict RGB color space, where values outside the 0-1 range will be clipped. But there is still no gamut remapping into a more restrictive space.
In order to assure that you’re in floating point space, I recommend using a ChangeDepth node to convert each Loader to Float16. Float32 is usually overkill—the extra precision gained is only useful in a few specific circumstances. I really ought to work that into this chapter.
Thank for your Answer
I understand that float numbers can go beyond the traditional limits (0 and 1 for a channel).
For me Gamut is all about where are those limits (1 especially) on the chromatic diagram …
But a question still remain :
If I color managed my Loaders and not my Saver, What would be the Gamut of the render files ?
Thank again
Roughly equivalent to ACES: 0 is video black, 1 is video white, and 18% grey is {0.18, 0.18, 0.18}. ACES is a little less saturated than pure, unclamped linear color, though. The resulting gamut is theoretical—it is wider than any device could possibly display, and all other known color spaces fit inside it in order to remove the possibility of clipping.
“Roughly equivalent to ACES” ➧ Can you advise me some sources to confirm that !
I try to understand/build an Global ACES workflow between Resolve and Fusion with of course plenty different non ACES materials/sources (that the point) 😉
But I lack a lot of info about Fusion and Strong color management or ACES.
Thanks again
No, I don’t have any sources. That assertion is based on observation and informal conversations. We don’t use ACES often, and my philosophy inside Fusion is to simply reverse whatever transformations I had to do to get into my linear working space, so what I return is exactly the same as what I received, plus the composited elements. As long as everything in the composite matches well, I don’t concern myself too much with the actual technicals of the color space. So my own understanding of color science is not as deep as I’d like, either.
If your intent is to use Fusion to render the ACES compliant EXRs, then you should take note that there is an ACES color space available in the GamutConvert. I *believe* that goes to ACEScg. For more confidence, look at using OCIO: http://opencolorio.org/
Fusion supports OCIO partially. I’m not sure where the limitations are, but there is some discussion of it at steakunderwater.com.
I found some more information on this topic, from Francois Lord via acescentral.com:
“So the primaries are the coordinates of the primary colors defining the gamut (the triangle) of possible colors. In VFX jargon (color scientists will disagree with this) we need three things to define a colorspace:
A transfer curve (also called transfer function, OETF/EOTF or just curve). This can be a gamma curve, a log curve or a linear curve.
A gamut, defined by the primaries. Is the maximum green of that colorspace a very saturated green, or a less saturated one?
An illuminant (also called white point). If you turn on all three primary colors to full intensity, you will get a white pixel. But will that be a warm white or a cool white?
For the sRGB colorspace, the sRGB curve is (close to) a gamma 2.2, the sRGB gamut is pretty small with not very saturated primaries, and the illuminant is D65 which is the color of average midday light in Western Europe / Northern Europe.
For ACEScg, the curve is linear, the AP1 gamut is very large and the illuminant is D60, which is a bit warmer than D65.
If you take an sRGB image and you linearize it, you end up with a linear image that still has an sRGB gamut and whitepoint.
In Nuke, the colorspace node has controls setup in three columns: the three components of a colorspace (curve, illuminant, primaries). But in the curve knob, you have access to entirely different color models, like HSV, CIE Yxy. This can be misleading. WHen you choose one, you can see that the illuminant control or the primaries control can become grayed out, because it makes no sense for that color model.”
http://acescentral.com/t/color-primaries-shifting-and-negative-values-ocio-confusion/892/9
Fusion works (mostly) just like Nuke, so upon linearizing your image, the gamut and illuminant do not change—if you go from Rec.709 to linear, you’re still in Rec.709. The difference is that if you want access to the controls referenced in Nuke’s colorspace node, you use the Custom feature in Fusion’s Gamut node. The Fusion ColorSpace is actually choosing different color models.
I’m still not real clear on some of this stuff, and I’ll keep learning and reading as much as I can until it coagulates in my head into something resembling knowledge! I think I got confused by my understanding of “gamut,” which had been defined to me as all the colors a system is capable of displaying—Fusion is unclamped, so that definition didn’t seem to apply to it. Now I get that it’s the colors in the triangular space defined by the primaries.
Hi Bryan,
Just started to use fusion a few days ago, and now after finding this site the learning is much easier…Keep up the good work – I bet a lot of people are thankful for such detailed free resources
Just 1 question – You wrote at the end that its best to convert any video into frames. Can you please explain how to do it ?
Certainly. If you want to do it in Fusion itself, just make a Saver and set the file type to any still image format. You’d probably want to avoid Jpeg since it would recompress the footage. Targa and Tiff are good choices for video in the sRGB or Rec.709 color space (most video that looks right when you watch in a video player like VLC). DPX for logarithmic footage (if it looks washed out and desaturated it’s probably log). OpenEXR for linear.
When naming your output file, be aware that Fusion will automatically handle the frame numbering. If you call the file “foo.tif” your actual output will be “foo0001.tif”. You should therefore put a . or _ at the end of the filename to get a sequence that is easier to use. “foo..tif” will give you “foo.0001.tif”. If you want more or fewer digits in the filename, you can give it the filename “foo_######.tif” to get “foo_000001.tif”.
Most video editing software can also export image sequences. All the major pro packages can, at any rate. Not sure about consumer-quality software like iMovie and Pinnacle. I don’t know the procedures for those off the top of my head, though.
Remember that when you’re dealing with image sequences, they don’t have audio, so if you need to sync to a soundtrack you’ll need to export that separately and connect it by right-clicking the Sound icon next to the HiQ button. Also, Fusion cannot automatically detect framerate from an image sequence, so you’ll need to set that yourself in the Preferences when you start working.
Thanks for the detailed answer
Hi Bryan,
First of all I would like to thank you so much for all your work and time spent sharing your knowledge about Fusion !
Coming from a photo-retouching background and developing a colour-grading activity, I’m currently learning Fusion following your teaching. As a newcomer, I hope I won’t bother you with irrelevant questions.
I’m currently working on building a sturdy workflow using Resolve for Color Grading, and Fusion Standalone for all VFX/compositing operations (since it’s far more stable that the integrated version…).
But then arise a lot of questions about color management strategies for such a workflow, especially when using the Fusion Connect tool…
I understand the point I need to work in linear in Fusion.
For that, I thought I can just use Fusion Connect to create an EXR file for the clip I want to composite using Fusion.
But it seems that Fusion Connect includes some kind of color management…
I ran a few tests and it first arose that any color correction done in the Color Page is baked in the Fusion Connect Clip, even if you bypass all grades.
This can be solved creating a new empty version without any adjustment before creating the Fusion Connect Clip.
But then, I still can be sure which color management is used to create this Fusion Connect Clip.
Let’s assume I’m grading clip using a Rec709 reference monitor, hence using DaVinci YRGB Color Science with my Timeline Color Space set to Rec709 Gamma 2.4.
Will my EXR Fusion Connect Clip be created with a baked in Rec709 Gamma ?
Can I just solve this by switching my Timeline Color Space to Linear before creating my EXR Fusion Connect Clip ?
Or should I just switch to Aces Color Science to solve this issue (although I already read many pages about Resolve issue with Aces and EXR, like this post https://www.facebook.com/groups/306080639552827/permalink/1242873619206853/) ?
Or eventually, should I just drop Fusion Connect tool, export EXR from the delivery table with the relevant color science, and then reimport my comp clip after Fusion work ?
I know that’s a lot of questions, both about Fusion Connect tool and VFX Color Management, and hope it won’t bother you,
Thanks again a lot for your hard work
Best
Julien
I’m afraid I really don’t know much about the Resolve end of things. I’ve never used VFX Connect. I prefer to pull my VFX plates directly from the camera master and do all necessary color transforms in Fusion so I can be sure there’s no funny business. That said, I’ll try to find some time to do a little experimenting and see what I can learn.
In the meantime, you can probably check to see what kind of color conversions are going on if you use an image or clip that you are familiar with. Run it through whatever process you think should be correct in Resolve and send it to Fusion. Once in Fusion, look at the Loader with all LUTs turned off. If it appears very dark and oversaturated, then it’s probably linear. Then turn on a Viewer LUT or use a Gamut to convert it to sRGB or 709. If it then looks how you expect, then you can be sure it was linearized correctly.
If it looks like you’d expect *before* turning on a LUT, then it’s still in whatever color space it was before you exported. In that case, use a Gamut or CineonLog tool to get to linear, do your work, and then send it back out using the inverse operation. Ultimately, what is important is that you wind up with a VFX clip that looks and behaves identically to everything else on your timeline so that you can treat it all the same when you are grading.
You probably shouldn’t use ACES unless your *entire* post-production pipeline is in ACES.
Hi Brian,
and thanks a lot for your quick and kind answer.
I’ll run some tests and will let you know what I can find.
But I already found this thread on Aces Central, where someone clearly states that Fusion Connect is a real mess concerning color management…
https://acescentral.com/t/aces-not-supported-in-bmd-fusion-9/1360/6
“I’m not Charles, but since I have also tried using this feature in an ACES project:
I resorted to transcoding my footage “by hand” to ACES-EXRs… in my case with REDCINE-X PRO. The fusion connect feature as of now leaves no control over the details of the transcode such as resolution, color space and gamma transforms — at least as far as I can tell.”
So I think I’ll adjust my workflow depending on my pipeline, dealing with ACES when it seems relevant.
Should I ask one last question : how do you deal with raw files, like R3D etc, when it comes to work in Fusion ?
Thanks a lot for your help, I’ll deepen my search about this Color management issue between Fusion and Resolve too
Best
Julien
I’ve never received raw files from a client, so any guidance I offer is likely to be speculative. Fusion can now open many flavors of raw, including R3D, but I don’t know how it handles them. I recommend asking over at We Suck Less : https://www.steakunderwater.com/wesuckless/index.php
There are people there that know a *lot* more about that part of things than I do.