Sometimes the effect demanded for a shot is more complex that what can be created in the compositor. Computer animated characters, sophisticated fluid and particle simulations, spacecraft, and detailed environments are more commonly created in separate, dedicated 3d software such as Maya, Houdini, or Modo, among others. These programs offer not just better modeling and animation tools, but much more powerful rendering engines. A render engine transforms information about 3D objects into images of those objects. Most 3d programs have their own built-in renderers, but most can also use add-on renderers like V-Ray and Redshift.
In addition to the finished image, the renderer can split the output into a variety of different buffers, or passes. Unlike photography, which can only record the combined light all at once, a renderer can record the surface color (diffuse), reflections, bounce light, shadows, and other properties of the light in separate images, which can then be combined in the compositor to construct the final image. While this may seem like a lot of extra work, it gives you a great deal of flexibility to exactly control the look of a Computer Generated Image (CGI). In this chapter, we'll look at render buffers created by Houdini's Mantra render engine and learn how to use them to control the look of a CGI character.
Terminology
First let's define some terms. It is sometimes difficult to know what someone means when they use certain computer graphics jargon because the words change meanings depending on context, and sometimes on who's using them. Let's start with that phrase: Computer Graphics. Technically, any image generated by a computer, Fusion's Fast Noise, an animated character, or a particle system, is "computer graphics." Usually, though, when someone refers to CG or CGI, they mean the output of a 3d renderer. If a facility is divided into 2d and 3d departments, the 3d side is sometimes referred to as the CG department.
Render can be a noun or a verb, or even an adjective. You can "render out" an image sequence on the "render farm" (a network of computers dedicated to the task of rendering) to produce a "final render"—the image which, although it might have been called final, is actually only an ingredient in your composite.
The beauty pass or buffer is the main image created by the renderer—the one you see in the render window. It can, ideally, be reconstructed exactly from the various render buffers in a process sometimes called "back to beauty" compositing.
A render pass might refer either to a component of the rendered image, like the reflections, or to a collection of objects that are rendered separately for the sake of convenience. For instance, you might have a pass containing the character and one containing the ground. Sometimes this latter sense is referred to as a render layer. To further confuse matters, a pass in the former sense might also be called a buffer, render element, or AOV (Arbitrary Output Variable). Houdini calls it an image plane.
For the purposes of this book, I will use the term render buffer, or simply buffer, to refer to any individual component of the render, regardless of whether it contributes to the beauty image or is a utility buffer used for some other purpose. A rendered image that contains only some elements of the shot will be called a layer. I will try to avoid the use of the word pass (title of the chapter notwithstanding), since it can mean either of those things.
The Alien Head
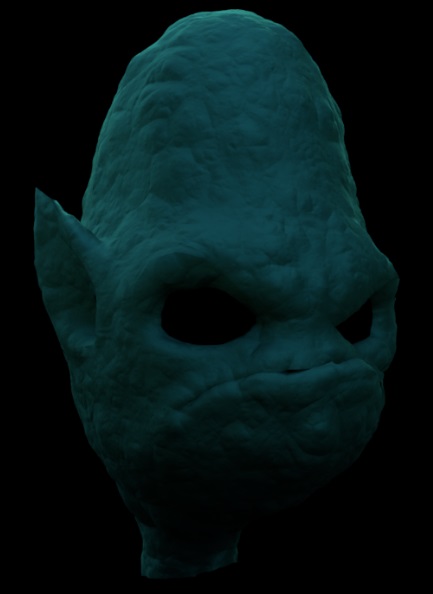
 The model in the images we'll be working with came from a Digital Tutors series entitled Introduction to Materials in Houdini by John Moncrief. I beg Mr. Moncrief's indulgence for using his work for my own purposes. It's a very good tutorial, although it takes a bit of ingenuity to follow along in the latest version of Houdini, as the SHOPs (SHading OPerations) workflow has been retired.
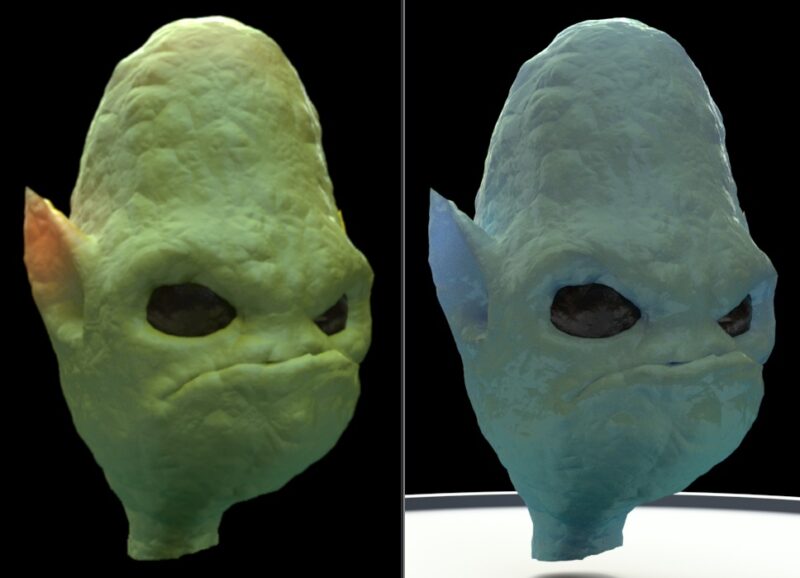
This image is the beauty buffer rendered from Houdini's Mantra renderer. It and the other buffers we'll use in this chapter can be downloaded here.
The simplest way to bring them all into Fusion at once is to select them all in a file explorer and just drag the whole stack into the Flow View. They'll be automatically Merged together, but the Merges aren't what we'll be using, so just delete them immediately.
Before we can get started, we'll need to make some adjustments to the Loaders thanks to the way Houdini makes EXRs. An OpenEXR file can hold any number of channels. Some artists and facilities prefer to simplify file management by packing every buffer into a single large file. This works well for Nuke users because Nuke can address up to 1023 channels in a single file, and it is designed to keep all of them in a single flow. Fusion, on the other hand, has only a limited number of predetermined channels, and only a few of its tools can interact directly with those channels. It is usually more convenient for a Fusion user to have their buffers split into separate files.
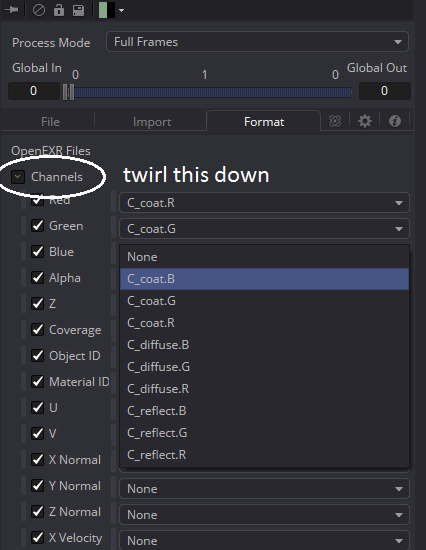 Although it's easy to get Mantra to create separate files for most buffers, I was not able to figure out how to get it to split the main shading components—diffuse, reflection, refraction, and coat—into their own files. In addition, I failed to direct Mantra to put several of the other buffers into the RGB channels. Therefore the first thing that needs to be done is to use the Format tab of each Loader to assign the channels properly.
The directLight file contains nine channels, so make two additional copies of that one so that you can separate the diffuse, reflect and coat buffers. Z, Normals, and World Position also have usable utility channels, so in addition to putting their data into RGB, also assign it to the appropriate utility channels. X usually maps to Red, Y to Green, and Z to Blue. That is not a hard-and-fast rule, but it's a common convention. As you go along, it's a good idea to rename each Loader node in order to put the name of the buffer first, making it easier to tell them apart. To rename a node, select it and press F2.
The images are in linear color space, so no Gamuts or CineonLog tools are required.
Now, let's start on our composite by taking a look at each buffer and its purpose. We've already seen the Beauty buffer above. It primarily serves as a reference for the lighting artist's idea of what the creature should look like. Sometimes you can use the beauty render as-is, but even if it's fantastic, I still recommend reassembling the render from its component parts in anticipation of notes. Addressing lighting notes in the comp is far faster (and cheaper) than sending it back to the lighter.
Note: Some renderers or workflows may not provide everything necessary for a back-to-beauty composite. Post-render tonemapping or unconventional shader configuration can make a process like this one more difficult, or just different. Don't be afraid to ask for guidance from your supervisor if the default approach described here doesn't work for the render you've been given.
Diffuse Color
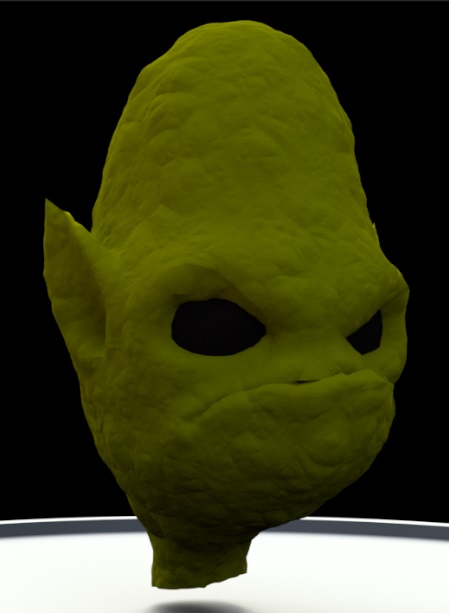 This is the Diffuse buffer. It contains the surface color information for the model and the direct lighting and shading. Diffuse usually serves as the foundation for your composite, and it is the first buffer you should put into place.
In some cases, you will see a buffer called diffuse texture or raw diffuse. Such a buffer will contain only the color, without the lighting. It might also be called albedo. The procedure for dealing with a set of raw buffers is slightly different than this one. I won't demonstrate that workflow here, but I will describe it at the end of this article.
Reflections
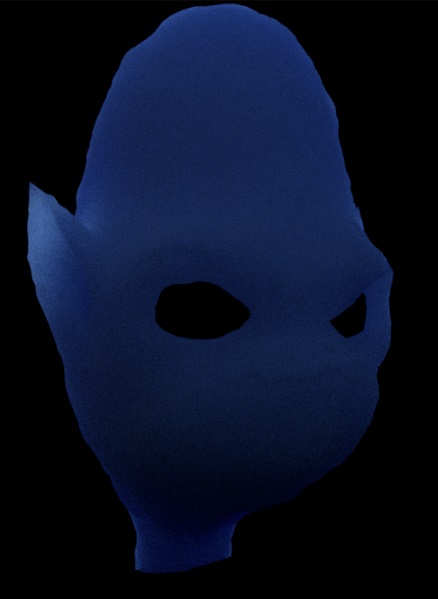
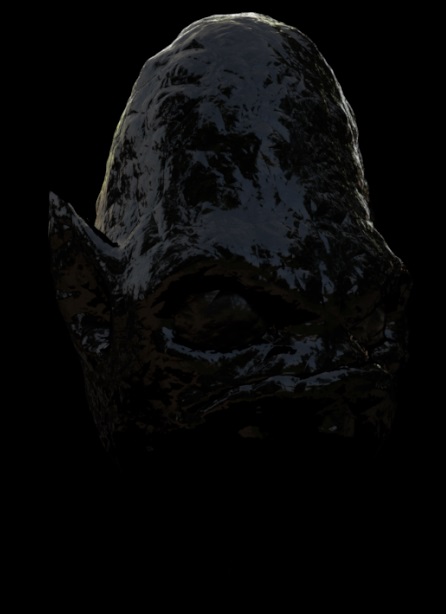 The Reflection buffer contains light that strikes the surface and bounces straight off, like a mirror. Most objects do not contribute any of their own color to a reflection—the color is instead provided by the environment surrounding the character. In this case, you can almost make out the shapes of the trees in the HDRi environment map I used as a light source.
Specularity
In most cases, the reflection buffer would be accompanied by a Specular buffer. Specular is sort of a CG "cheat." In the real world, there is no such thing as a specular highlight—any such bright spots are actually reflections of the light source that created them. Therefore, a physically "correct" render would only use visible lights displayed in a reflection buffer. It is rarely worth the effort to get absolute physical correctness, though. A typical CG light is an infinitesimally small point and therefore creates no reflections. Instead, the shader creates a fake reflection and puts it into a separate specularity buffer. Since this character was rendered with only an HDR environment light, there was no need to create a spec buffer.
Refractions
There are no transparent materials in this scene, so there is also no Refraction buffer. In a case where you do have glass or water, the color of objects seen through that material will be carried in the refraction. Usually glass will have both reflective and refractive information, and those components are rendered separately.
Coat
 On the other hand, I did include an unusual secondary reflection buffer called Coat. Houdini's shaders permit a sort of lacquer layer of reflection on top of the regular reflections. This layer can have a different roughness value, and in this case, it also has a different color. The tutorial I was following used this coat layer to give the alien an odd sort of iridescence—his color changes slightly depending your angle of view. The buffer has the effect of turning the sickly green diffuse into the bluish-green color of the beauty render.
Indirect Light
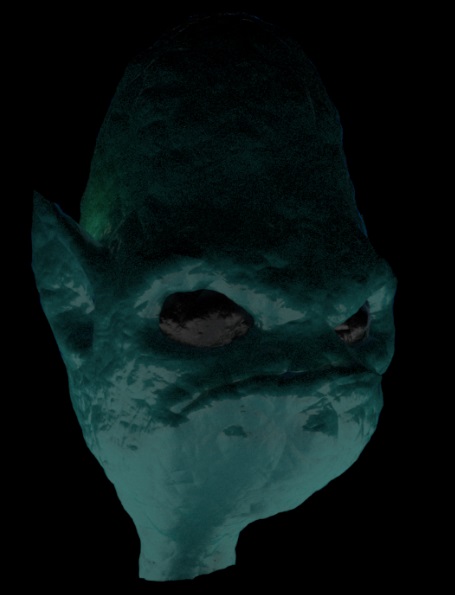 The Indirect Light buffer, which might be called radiosity or global illumination (GI) carries information about light that had already bounced off one other surface, picking up some color along the way. Notice the bright spot above the ear—the sunlight struck the ear and bounced off, pushing some of the color onto the side of the head. The strong underlighting is due to reflection from the turntable object that you can see in the beauty and diffuse buffers.
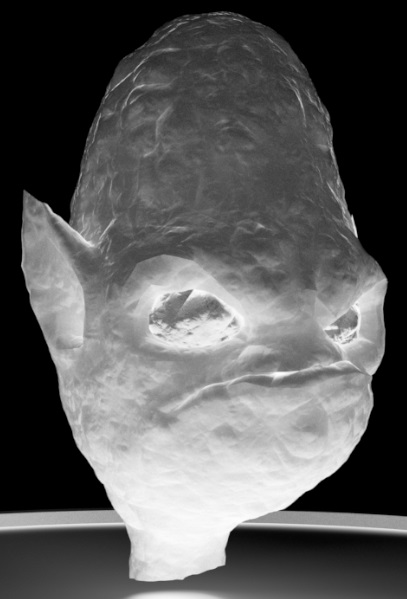
Sub-Surface Scattering
 In some materials, such as skin or wax, light may enter at one point, bounce around a little inside, then exit somewhere else. Under very strong light, this can create a sort of glow in the substance. In human skin, this glow is red because it picks up the color of the blood and tissue it passes through. Our alien has bright blue blood, so his SSS buffer is likewise blue. Our sub-surface buffer is probably a little too strong—this guy apparently doesn't have much bone in his head to block the scattering effect.
Those are all the buffers we'll need to do our back to beauty composite. I have, however, included a few other utility buffers that can be used to further alter the alien's appearance.
Ambient Occlusion
Another buffer I did not render for this scene is the Ambient Occlusion, sometimes shortened to Occlusion, AmOcc, or AO. This buffer is dark in places where surfaces are close together, simulating the shading that occurs in crevices and corners. Usually ambient occlusion is not part of the beauty render, but some artists like to use it to slightly boost the contrast of an image.
Shadows
 You may occasionally find it useful to be able to tint the shadows of a CG object to better match a plate. It is not unusual for a lighter to neglect the shadow color, but as you attempt to integrate the character into a scene, you may find that the shadows in the plate have a blue cast. This shadow buffer can be used as a mask on a color corrector to influence the shadow color. Or, if you just want to deepen the shadows, you can invert it and multiply it by your render.
It is also common to render a shadows layer, in which primary visibility for most objects is turned off, but they are still permitted to cast shadows on the ground. This shadow layer is used to mask a Color Corrector applied to the plate, and it permits the illusion that the CG object is casting a shadow onto the photographed ground.
Normals
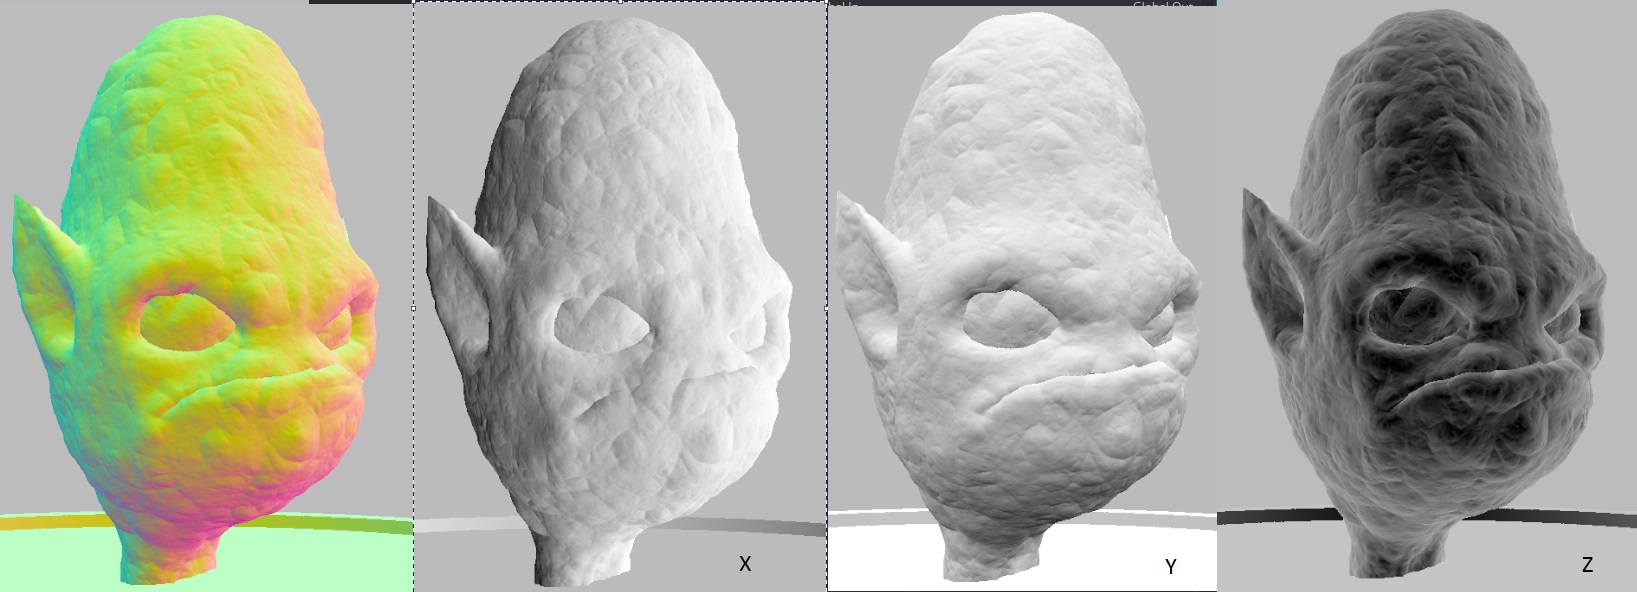
The Normals buffer doesn't contain information about color, but about the geometry. Specifically, it encodes a 3D vector indicating a line perpendicular to the surface at each pixel. Some renderers create normalized Normals (and isn't that some confusing terminology!) As displayed above, values in each channel go from 0 to 1. Others use values from -1 to +1. In the X Normals channel, which is usually put in the Red channel, the lowest value (0 or -1) indicates that the X component of the vector is pointed to screen left—perpendicular to the camera's axis (or parallel to the screen's surface, if you prefer), and a value of +1 is pointing toward screen right. The Y, or green, channel indicates the verticle component of the vector, with low values pointing down and high values pointing up. The Z, or blue, channel indicates whether the vector points toward or away from the camera. Dark pixels indicate that the surface is facing the camera. Although I have normalized this Normals buffer for display, the actual data uses the -1 to 1 range, which is what Fusion expects.
The Normals buffer is most often used to add additional lighting to a model, but it occasionally has other uses. In combination with information about the camera, it can be used to create Ambient Occlusion even if an AO buffer wasn't rendered. The Z Normals buffer is handy for simulating a Scanning Electron Microscope or X-Ray look. Normals can also be generated with reference to world coordinates, allowing you to do things like desaturating upward-facing surfaces to simulate sun bleaching.
World Position
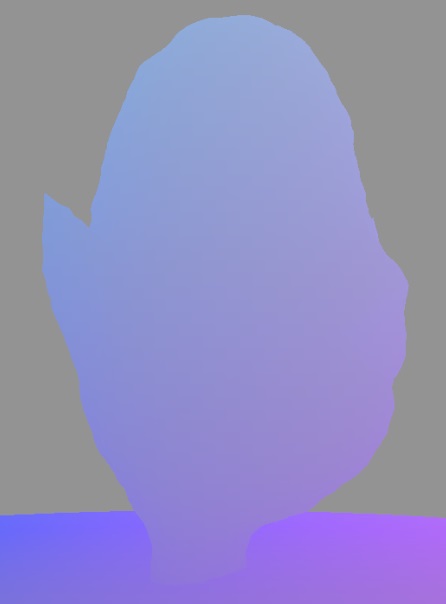 The Position buffer contains information about where a pixel is in the context of the world coordinate system. You can use Fusion's Volume Mask tool to create masks that "stick" to specific places in the scene, regardless of what the camera is doing. VolumeFog can be used to fake some environmental dust or moisture that is automatically occluded by objects in the scene. And a trick I learned recently from Vito of Con-Fusion: Using the world position buffer as a displacement map on a plane, you can approximately recreate your geometry in Fusion's 3D system, providing the opportunity to do dozens of interesting things.
Like the Normals buffer, world position often has negative values, but since it is measuring distances in the scene, it can reach magnitudes much greater than -1 to 1. A value of 36 in the X (or Red) channel indicates that the pixel is 36 units away from the origin in the positive X direction. What exactly those units are—centimeters, inches, kilometers, or parsecs—depends on your settings in the 3D software.
Z-Depth
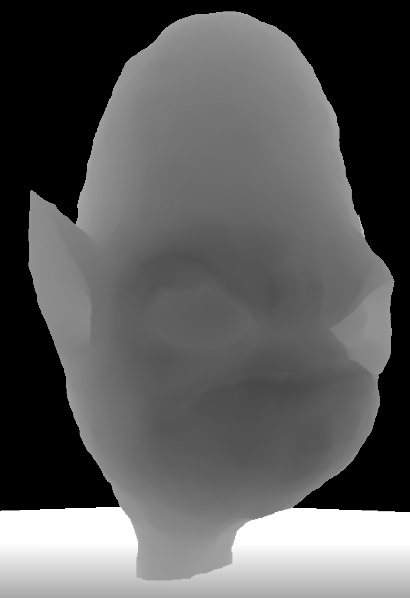 The final utility buffer I created for this scene is the Z-depth buffer. This image describes a pixel's distance from the camera. The further away the pixel is, the brighter it is. Again, values will likely go much higher than 1, as a "correct" Z buffer encodes the actual distance as the Z value. Most renderers can be instructed to create a normalized Z buffer if desired, though. In this image, I have used a Brightness/Contrast node to change the white and black points in order to exaggerate the distances and better illustrate the information. Even normalized, the depth buffer will look white in your Viewer.
Z-depth can be used to add depth of field to the CG image, which can be expensive to compute in the renderer. The results may not be perfect, but when used carefully it's better than nothing. The Z buffer may also be used to create atmospheric perspective—by tinting distant objects blue and reducing their contrast, you simulate the diffusion caused by the air between the object and the camera. You can also use it to merge together several layers that have Z channel information so that they occlude one another correctly. Again, though, this tends to be an imperfect process. The Z buffer is not anti-aliased, so sometimes harsh edges can be introduced between objects at different depths, and there is always a bit of uncertainty around edges about whether a given pixel should belong to the background or the foreground.
The Back to Beauty Composite
Assuming the CG buffers were rendered properly in linear color (and you aren't dealing with raw buffers, see below), reassembling the beauty from the component buffers is quite easy. Add everything!
Starting with the Diffuse pass, create a ChannelBooleans node, set the Operation to "Add" and change To Alpha to "Do Nothing." Connect one of the other lighting components to the Foreground input. It doesn't matter which one you choose; addition is commutative, so you get the same result no matter what order you add the buffers. However, if you're planning to multiply in the Ambient Occlusion, then you might want to leave the Indirect for last so you can multiply the AO just before you add it. Indirect already has ambient occlusion built-in due to the way it's created. We don't have that to worry about here, though.
Add Reflection, Coat, Sub-Surface Scattering, and Indirect together, remembering to set Alpha to "Do Nothing" in each ChannelBooleans. When you're done, put the Beauty buffer into View Buffer B and use the , and . keys to flip back and forth between the two images, verifying that they're the same. There should only be two differences: The Alpha channel, and a very slight difference in the noise.
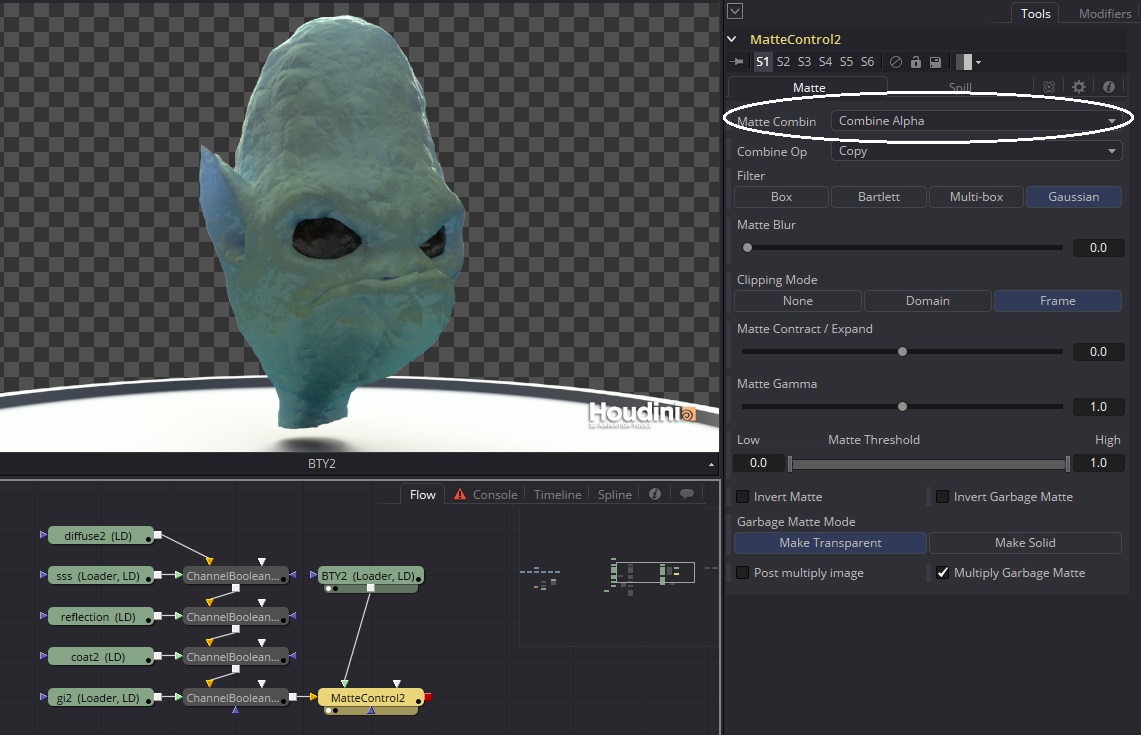
In these renders, Mantra did not insert the Alpha into the component buffers, so it needs to be taken from the Beauty buffer and copied to the composite. A MatteControl node will accomplish that task. The composite goes into the gold Background input and the image you're taking the alpha from goes into the green Foreground input. Set the Matte Combine field to "Combine Alpha" and ensure that the Combine Op is "Copy." Although the components did not contain an Alpha, the image is, in fact, already premultiplied, so leave the "Post multiply image" switch off.
If we had a specular, refraction, or emissive buffer, those would be added just like all of the other components.
Component-level Compositing Changes
This composite is your starting point to begin tweaking the look of the alien. Let's suppose the client thinks the alien looks too wet, and although they specified he should have blue blood, they've changed their mind and want him to be red-blooded instead.
The wetness is mostly caused by how reflective he is, so the best way to dry him out is to reduce the amount of reflection that's being added. Go the ChannelBooleans node that adds the reflect, and turn it down until you like the look. I wound up at 0.5. There is also a lot of reflection being carried in on the bounce light, so let's turn that down quite a bit, too. Besides, he was looking a bit too underlit. I've turned my Indirect down to 0.4, and he looks much better.
The blood color is easy to change as well. All we need is a Color Corrector right after the SSS node. Move the Hue control until the ear turns a nice pink color. The entire rest of the head will also move toward a yellow-green instead of the blue it was before. When the next note comes in, the client likes the ear but thinks the rest of the head should still be more blue than yellow. Can we do anything about that?
That one's a little tougher, but taking a look at the SSS buffer, it's clear that the ear is brighter than the rest of the head, so perhaps a little more color correction could take care of it. I used a BrightnessContrast to make a few adjustments (Clip Black is important when adjusting the Low, Lift, or Brightness controls), then a Blur to reverse the way the color correction pushed the color out of the ear, and finally turned the Add's Blend control up to 2 to get the brightness back.
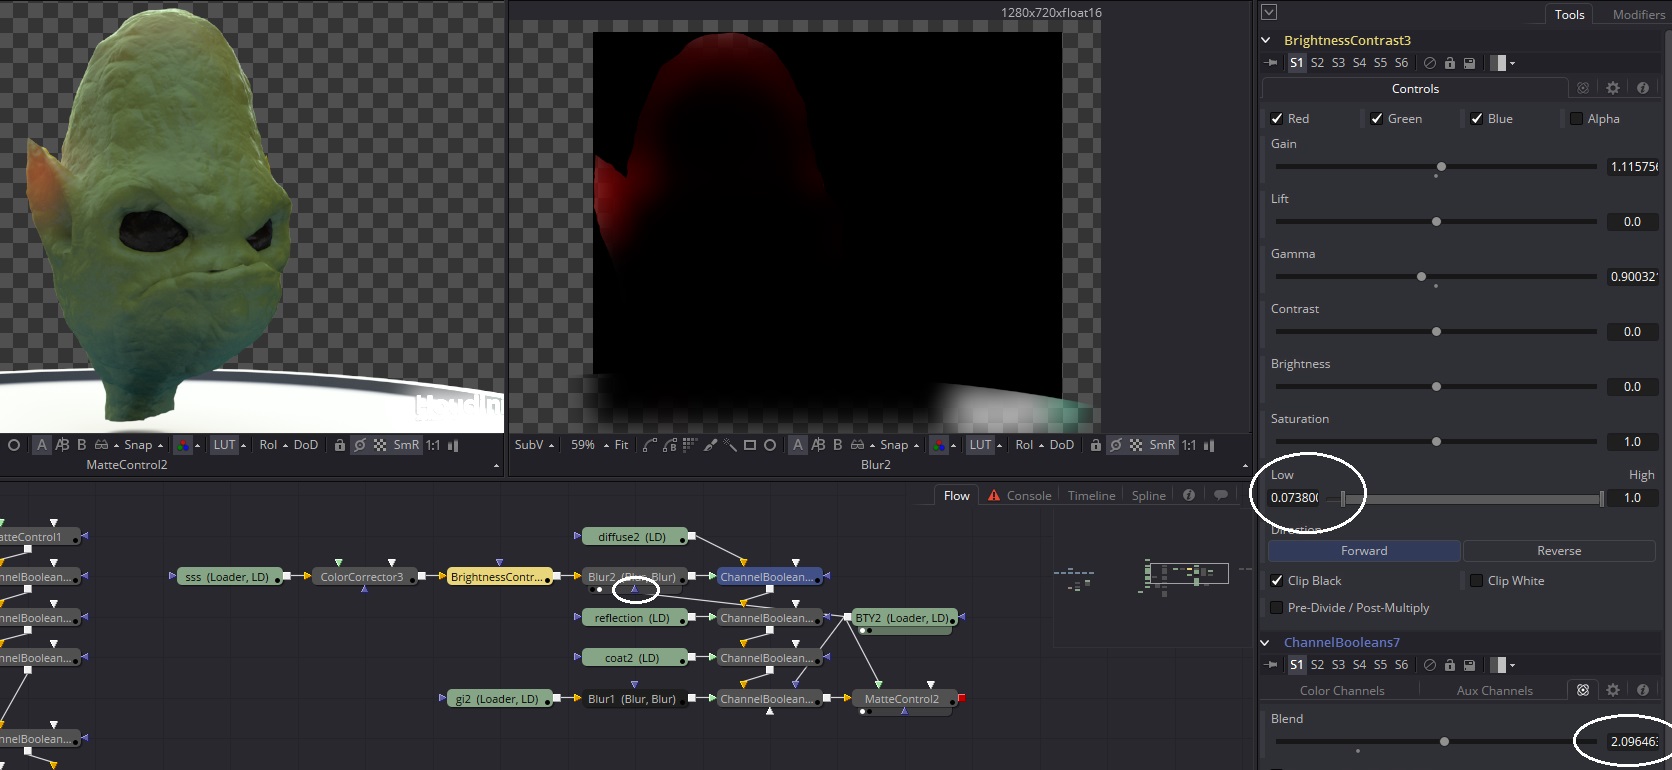
Notice also that the Blur has been masked using the Beauty buffer's Alpha in order to prevent the SSS color from creeping out of the alien's head.
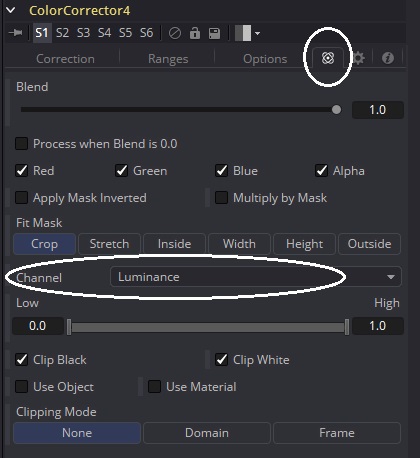 Let's now move on and see how we can use some of those utility buffers. We'll start by using the Shadow buffer to do something about our guy's blue five o'clock shadow. Add a ColorCorrector to the end of the flow and wire up the Shadows into the Effect Mask input. In the Common Controls tab, change the Channel control to "Luminance." Now the tool is being masked by the brightness of the input image instead of by its Alpha (which like all the other buffers is solid white).
Now adjust the Color Corrector until you're happy with the alien's chin. Since the buffer affects all of the shadows, you may need to balance your correction with adjustments to the component buffers or with an overall color correction to the entire head.
Relighting
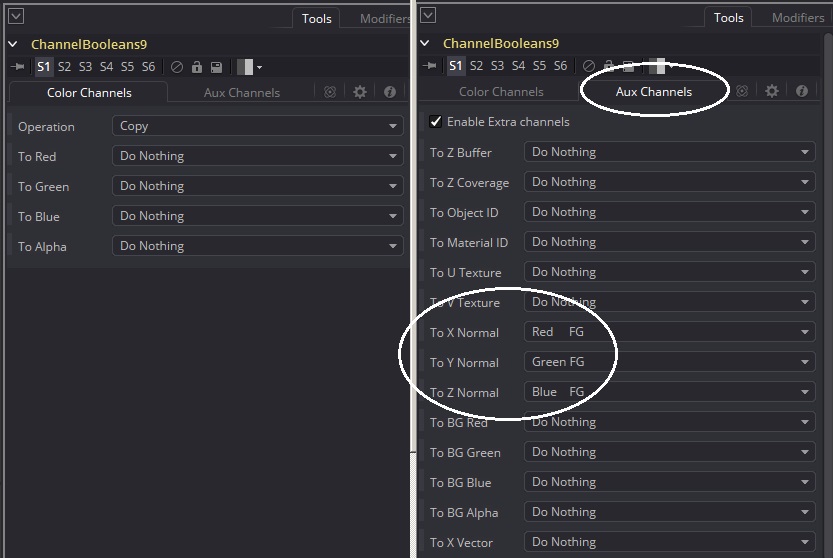
The Normals buffer is a fun one to play with. Use a ChannelBooleans node to shuffle the Normals information into the Normals channels of the main flow (I used the RGB channels simply because they're faster to access, but those channels should contain the same information as the Normals channels):
Now add a Shader node. On an object with a surface like this one, the Shader makes adding new lights very easy. Turn Ambient and Diffuse all the way up to 1.0 to preserve the existing color, and turn Specular to 0.0 to prevent adding any additional wetness. Then start adjusting the Equator Angle and Polar Height to change the angle of your new light. The Shader node certainly has its limits. For instance, if you turn Specular up and give the alien a rim light, you'll see that it doesn't anti-alias the edges well at all. It also has a problem with in-camera motion blur, depth of field, and sub-pixel details like fur. Still, if you use it carefully, it is a very useful ability.
Volume Masking with World Position
The client really likes the work you've been doing, but they suddenly hate the turntable and want it gone. The lighter didn't render in layers, so you'll need to find a way to create a mask for the turntable so you can clear it out. Fusion includes a useful node called VolumeMask that can use position data to select 3D locations from a 2D image. If you didn't do it when setting up the Loaders, go to the Format tab of the World Position Loader and put R, G, and B into the X Position, Y Position, and Z Position channels, respectively. You could insert this position information into the main flow like you did with the Normals, and sometimes it would be easier, but in this case it isn't necessary.
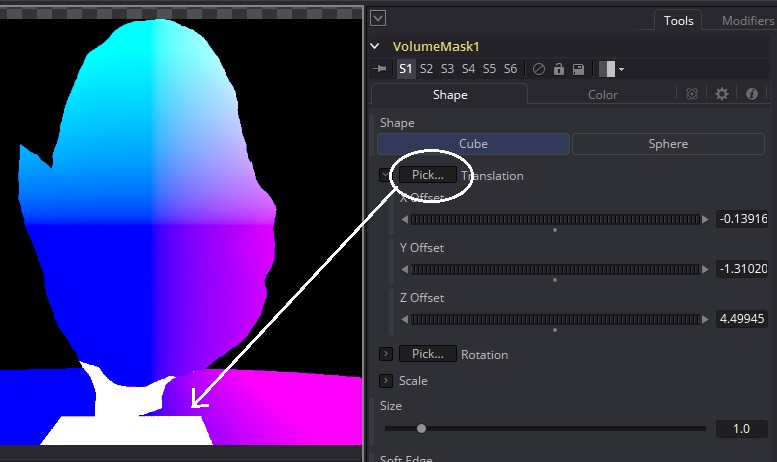 Add a VolumeMask tool and connect the World Position to its Image input. When you put the VolumeMask into the Viewer, you will see that the black areas in the buffer have become white. Right now, the tool is masking all of the areas that have a value of 0,0,0 in the world position. Since the background didn't have any data, that's the only thing that has that value. If the world origin were visible, there would also be a small square at that location. Drag the Translation Pick box to a spot just below the alien's neck. You'll see that a cube volume turns white around that area.
Twirl down the Scale controls and uncheck Lock X/Y/Z. Adjust the X Scale until the entire width of the turntable is white, then adjust Z until you cover it all the way to the back. Then reduce the Y Scale until none of the alien's neck is covered. That will create a gap at the back of the turntable because the geometry apparently wasn't flat against the ground. To compensate, twirl down the Rotation controls and adjust X Rotation until that area is covered.
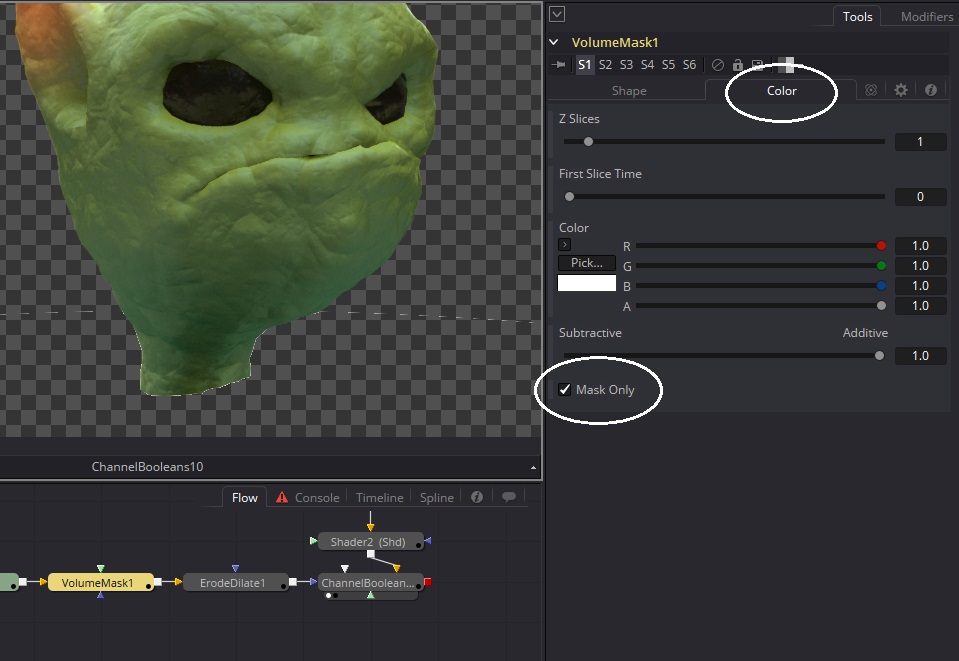 Once the entire turntable is covered, switch to the Color tab and check the Mask Only box. Now you have a matte you can use to delete the turntable from the render. Add a ChannelBooleans node to the end of the main flow and set its operation to Clear. Connect the VolumeMask to the Effect Mask input, and most of the turntable will vanish. There is just a small amount of residual information where the anti-aliased edges did not fall into the volume. Add an Erode/Dilate node and increase its value until those edge pixels are gone.
Depth of Field with the Z Buffer
For the final step, let's add a very shallow depth of field blur to the alien's head. Use a ChannelBooleans node to put the Red or Z channel from your Z depth Loader into the Z Buffer channel of the main flow. The Z depth buffer had only one channel, and it was labeled R, so it likely came into Fusion with the Z information in all three color channels. You could use any of those channels or the Lightness as a source for the Z channel. Create a Depth Blur node.
As I noted when displaying the Z buffer earlier, the range on this particular buffer is problematic. The default Z Scale value in Depth Blur assumes a rather large scene, so it is much too high. The values in our Z buffer run from a little more than 3 (not counting the empty background) to a bit less than 8. Normal Z buffers will have values in the hundreds or thousands. So let's reduce the Z scale by three orders of magnitude to 0.2 to start with. Drag the Focal Point Pick… box to the spot you want the focus to remain sharp. I recommend the camera left eye.
Raise the Blur Size until you get a pleasant amount of blur around the ear and the camera right side of the face. The eye should stay in sharp focus while most everything else gets softer. You can increase the Depth of Field value to keep more of the face in focus, but due to the limited depth of the image, even the very small values you get by control-scrubbing the slider will probably be too high. 0.2 is probably about as high as you should go to still be able to see the effect.
Although the texure is getting soft, the edges may still be very crisp. The problem with a depth blur is that the Z buffer is not anti-aliased but the color pixels are. As a result, some of the edge gets assigned to the background and some to the foreground, resulting in very different filtering for pixels that should all be treated the same. Sometimes you can ameliorate the problem by adjusting the parameters slightly. In this case, I found that picking a focal point from the edge of the eye socket (a spot that on a human would be the zygomatic process) altered the blur such that the edges looked better. Even so, turning the blur way up shows that there are still some artifacty areas where the z-buffer's tones are non-continuous.
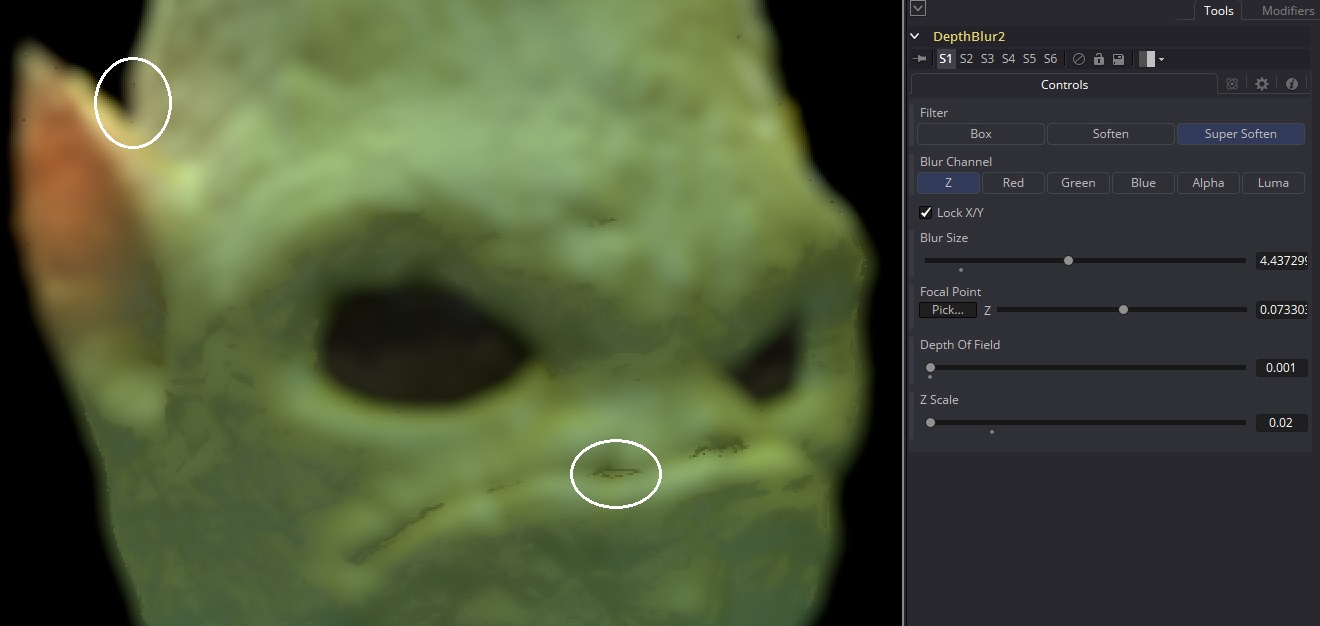 Obviously you wouldn't want to turn the blur up that high—it looks horrible, but exaggerating it like this reveals places where you can expect the blur will break down, and when you return to a more reasonable value, like my final setting of 0.77, you can keep an eye on those spots in case you need to do something to help them out.

Here's a look at the finished look compared to the beauty render. It's a pretty significant difference, but it was accomplished without sending the shot back to the CG department, saving quite a bit of time and money.
Raw Buffer Compositing
I unfortunately do not have an example of a raw render at the moment, so a description will have to suffice. The difference between the process described above and a composite using the raw buffers is that each raw image must first be multiplied by the diffuse surface information before being added. In this case, the diffuse buffer will not have any lighting information—it will be a very flat-looking image that only shows the original texture color before any actual shading happened. Here's a typical formula:
Raw GI * Diffuse + Raw Lighting * Diffuse + Spec + Raw Reflection * Reflection Filter + Raw Refraction * Refraction Filter + Self Illumination + SSS
The buffers that aren't multiplied by the Diffuse are ones that do not pick up any color from the surface. Specularity is a mirror-like reflection that only contains the color of the light that created it. Self illumination (emissive) provides its own color, and SSS gets its color from whatever is below the surface, not from the surface itself. Refraction and Reflection get their color from the objects being reflected or refracted, not from the rendered surface itself (although in the event that it's reflecting itself, the Diffuse texture may be where those colors actually come from after all, but that's a rabbit hole I'd rather not dive down at the moment!)
While this method is more complex and more difficult to remember, it does have some advantages. For instance, in the event that the texture needs to be altered in the composite, the lighting can remain reasonably close to correct. Changing the texture in this fashion requires a UV render buffer and the use of the Texture node. Or the color of a light can be changed without changing the color of the surface it is falling on.
Other Buffers and Techniques
Occasionally the lighter may turn over separate render layers for each light in the scene, allowing you to adjust the relative brightness and color of each light. These lighting layers should each be precomposed as described above and then added together. Any geometry-related changes, such as relighting with the normals, should be done after the lighting layers have been combined.
A UV buffer can be used to add additional textures or decals to a rendered model with the Texture node. The UV image maps pixels in the rendered image to coordinates in a texture map. The UVs can also be used with the VolumeMask tool to create masks that will stick to a model that is moving, even flexing.
Mask buffers may be rendered out into pure RGB colors, allowing you to use a Bitmap tool to isolate specific objects or materials in the image. Another method of selecting objects like this is the ObjectID or MaterialID buffer, but these are integer-based images with no anti-aliasing that are not as useful. If you are given an ID pass, you will need to extract the matte you need from it, then multiply it by a Coverage buffer to treat the edges. Coverage contains information about pixels that were filtered during the render. The ID * Coverage method is not as accurate as an actual matte buffer for a given element, but sometimes it's all you have. Another possible masking buffer is the so-called "clown pass," which displays the wireframe color for each object in the scene. Mattes can be extracted from this buffer using a chroma keyer.
Motion Vectors contain information about how a CG object is moving from one frame to the next. If rendering motion blur in 3D is too expensive, it can often be applied in the composite. Motion vectors are usually provided in "screen space." That is, the movement is relative to the camera, not necessarily the world. In that case, it is common for the Red channel to hold X and the Green channel to hold Y vectors. These channels can be used with Fusion's VectorMotionBlur node or the ReelSmart MotionBlur plug-in to blur the CG. 2D motion blur has some limitations—it doesn't handle rotating objects very well, for instance. A helicopter's rotors will be blurred into a diamond shape instead of a circle. However, it is much easier to tune it to exactly match the blur in a plate because it is more interactive than the 3D render would be.
An Emissive buffer is usually Added to the composite just like any other lighting buffer. It is frequently useful to also blur it and add the blurred version in as an optical glow. Just make sure you add the glow after any premultiplication you need to do—you don't want it clipped to the edges of your alpha.
Volume light information can be Added at the same time as glows. This may be a general volume fog across the entire scene, in which case you might want to modulate it by a depth map for your plate, or it could be a CG flashlight beam illuminating dust or smoke.
Most renderers permit the lighting artist to render any bit of data they can think of to an Arbitrary Output Variable. If you run into a buffer that you don't know how to use, ask your comp supervisor or the lighting TD how it is meant to be applied. Obviously, you don't have to use every buffer you are provided, though. There are no extra points for over-complicating your flow. On the other hand, don't be afraid to use a buffer in a fashion it was never designed for! If you run into a problem with a render, take a look through all the buffers you have and see if you can come up with a way to use one of them to solve your issue. If you absolutely can't solve a problem with what you have, talk with your lighter to see if they can output an element that will do what you need.
UPDATE: For convenience, most compositors use a script to automatically break out their EXR passes. Here's one created by Sven Neve of House of Secrets and recently updated for Fusion 9 by Andrew Hazelden:
hos_SplitEXR.lua at Steakunderwater.com
That leads to the forum thread where the script lives for now.
Next Time
In the next chapter, we'll start learning about compositing with a 3D system. We'll build on what we have learned about render buffers and shading to construct a simplified multi-pass render with Fusion's 3D tools. We'll also look into other ways we can transfer other information from a 3D program into Fusion.
He Bryan,
Thank you for this great article. I learned a lot 🙂 The only thing where i can't follow is the stuff with the DOF and the Z-buffer.
"For the final step, let's add a very shallow depth of field blur to the alien's head. Use a ChannelBooleans node to put the Red or Z channel from your Z depth Loader into the Z Buffer channel of the main flow"
Cause i am a newbie to Fusion i just don't know how to do this.
Maybe whenever you got some time left you could explain me how to do this?
Thanx in front
Greetz Lenny
He Bryan,
Sorry for the other comment, there is no need to explain it anymore 🙂
I just found a tutorial on how to put the Red or Z channel from the Z depth Loader into the Z Buffer channel of the main flow:
https://www.youtube.com/watch?v=GueJj4rc3r4
Greetz Lenny
I recommend bookmarking the Tool Reference document. Most of Fusion's nodes are reasonably well documented there, and it should be the first place you look for information when you don't understand what a particular node is doing.
That said, thanks for pointing out where the information I am providing is less that complete! I'll be sure to add some additional explanation of ChannelBooleans to this chapter during the next revision.
Whoops! Didn't leave the link: http://documents.blackmagicdesign.com/Fusion/20160908-822f6d/Fusion_8_Tool_Reference.pdf
Thanx Bryan for your reply and the link 🙂
thank you for this introduction to what certainly feels like an extraordinarily complex subject. as pretty much a solo, micro-budget operator (with no 'supervisor', alas!) i will be using blender, and since fusion is free, perhaps many others will too. on the one hand i was thinking that i could easily go back to blender and change the lighting, SSS, colours or anything else, but the big problem is the render time. so now i definitely think it will be a good idea to be able to control things in the comp. fortunately, blender will produce most (perhaps all) of the layers one might need (https://docs.blender.org/manual/en/dev/render/cycles/settings/scene/render_layers/passes.html).