Thus far we have talked a great deal about how to integrate footage together, how to manipulate it, and how to cut it apart and sew it back together in a new configuration. What about creating effects that the production didn't shoot?
There are generally two ways of approaching an effect that needs to be added to a shot. Usually the easiest and simplest method is to find some kind of prepared element. I doubt you will find a VFX shop that doesn't have several collections of such elements in its library. For my occasional freelance work, I have a subscription to Digital Juice and a collection from Video Copilot called Action Essentials 2. These provide me with enough stock footage and elements to cover most of my needs. If you have access to a decent camera and a place with controlled lighting, you can also frequently shoot your own elements. This can be as simple as making blistering vampire flesh with hot sauce and baking soda, or as complex as setting up a cloud tank.
The other way is to create custom effects either in 3d software or in the compositor itself. Fusion has a powerful particle system that works in both 2d and 3d as well as many image and pattern generation tools to generate unique effects that can be driven by your footage. In this lesson, we'll use an element to give James' gun a muzzle flash and a particle system to create smoke streaming from the barrel. We'll also add some interactive light on his face and hand to better sell the flash.
As usual, you can download the footage here. The muzzle flash element is available from productioncrate.com, where you can (as of the time that I wrote this) register for a free account that entitles you to download 5 clips per day. Their license prevents me from hosting the element myself, so you'll have to go there to download one that suits your fancy.
Once you've imported the footage into a new comp, take a moment to set your composition Preferences. The plate's resolution is 853×480, and you'll save yourself some frustration if you set the comp to match.
The Muzzle Flash
We covered the process of recoloring that orange gun barrel in the Tracking chapter, so I won't go over that again here. This plate's color space is Rec.709, and it is an 8-bit integer image. Once more, we need to convert it to a format that is more conducive to compositing. First, in order to get the color latitude necessary for a successful conversion to linear space, we'll again use the ChangeDepth node to convert the image from 8-bit integer to 16-bit float. Then a Gamut tool converts from Rec.709 (display), aka "ITU-R BT.709 (display)" to linear. A similar procedure on the muzzle flash element brings it into linear space as well. The element may be 709 or sRGB. Use your best judgement as to which gamut conversion looks nicest.
James pulls the trigger quite a few times in this brief shot, so we'll wind up using this flash more than once. Furthermore, it's very unlikely that the element will line up with the plate at just the right spot, so we're going to need to manipulate the timing of the element. Step through the footage and take note of which frames you want a flash on. This is a Green Gas powered gun, so the slide actually operates as though it were a real weapon, making it easy to see the relevant frames: 12, 19, 24, 30, 36, and 41 are the frames where the slide is fully extended. (Safety note: This weapon only fires if there is a pellet in the chamber. The camera operator and any other crew standing down-range of the gun should wear eye protection.)
The flash element I selected is 14 frames long, with the flash itself appearing immediately on its first frame. Other elements may have the actual flash on frame 2 or 3, or even later. If that's the case, use the Trim In control in the Loader to set the first frame of the flash to appear on the first frame of the comp. Then set the Global In control to frame 12. Now the flash will appear on the correct frame for the first shot*. You could then copy the Loader several times and set the Global In for each copy to the frame of one of the shots, but that involves a lot more file access time than we want. Due to the way Fusion handles Quicktime files (which is what my stock footage is), every Loader with a .mov in it adds a couple of seconds to the time it takes to load the comp. It also generates much more traffic across your network if the element is hosted on a file server, which is usually the case in a VFX studio.
Instead, we'll take branches off of the single Loader and use TimeSpeed nodes to slide the branches to the frames where we want to see flashes. TimeSpeed is found in the Miscellaneous category. Since we have five additional flashes, we'll need five TimeSpeeds to take care of them all. TimeSpeed is a relatively simple node. It can be used to speed up or slow down a clip, or to change when it begins. For this comp, we only need to be concerned with the Delay control. Choosing the right value for each node is as simple as doing a little subtraction. Our current element starts at frame 12, and we want the next one to appear at frame 19. We therefore need a seven frame delay (or possibly six if you want the flash to appear when James squeezes the trigger rather than when the slide is fully extended). Verify that the flash is in the right place by going to frame 19 and viewing the TimeSpeed. Do the same to place the flash on each of the frames where you want a shot. You will obviously want to eventually move and resize the element to the correct location, so it's a good idea to add some Transforms as you go along. And for your own sanity, keep the flashes organized in the flow. I put mine in order top-to-bottom from earliest to latest.
Now, of course, the element needs to be moved over the muzzle of the gun and Merged on top of it. Since it's likely you might want to do some processing of the look, and anything you do you'll probably want to do to every copy, Merge all the flashes together first, and then put the entire stack over your plate. That way, you can use a single Color Corrector and/or SoftGlow, and/or whatever else you like instead of having to manage six of them.
And here's a trick for quickly Merging images: pull a wire off the output of the tool you want for your Foreground, and drag it to the output of the tool you want for a Background. A Merge will automatically be created with both tools connected.
At this point, you've probably got something that looks like this:
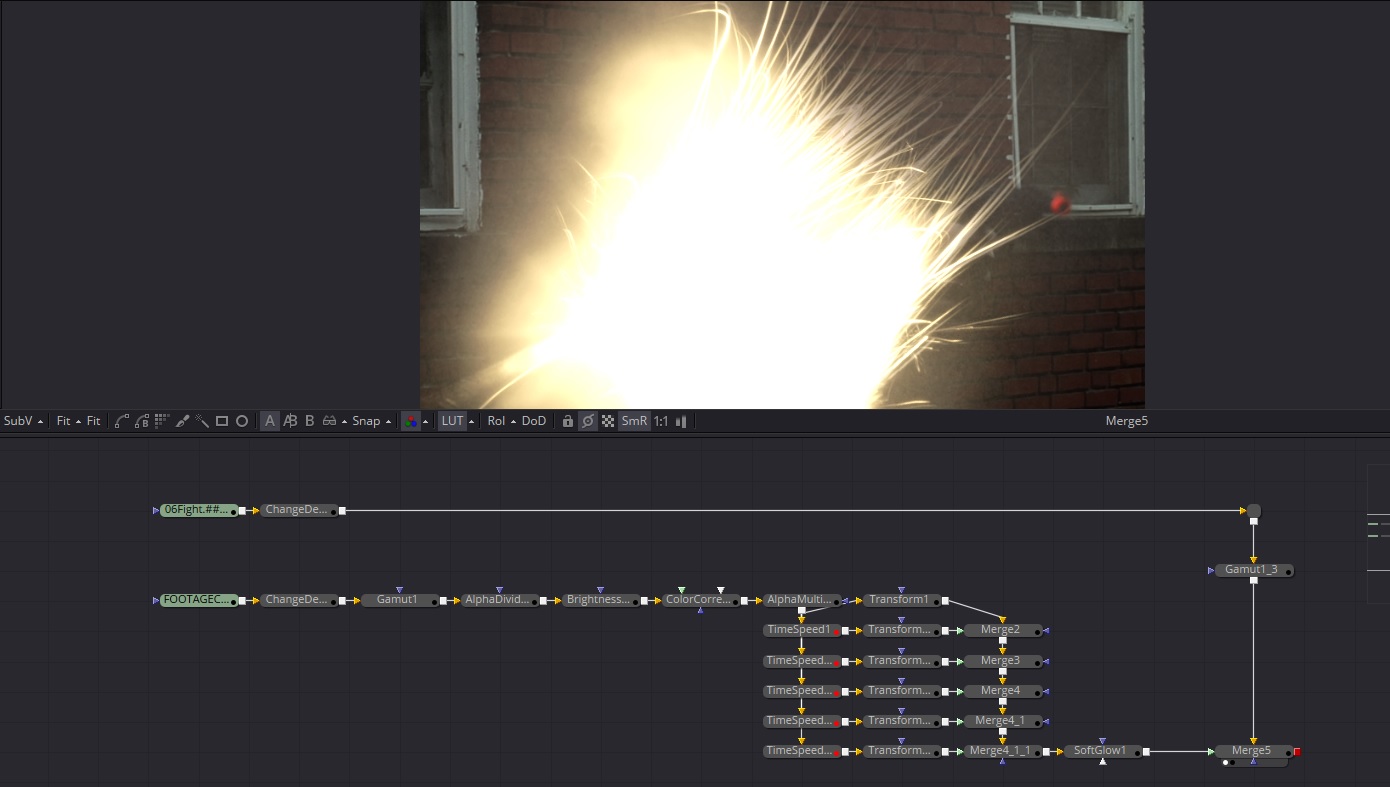
I'm sure you can figure out the next steps: Scaling, rotating and transforming until the flash is over the muzzle of the gun. Since we're only using a single element for six flashes, though, there are some things you can do to make them look less identical. There are some switches in the Transform tool to Flip Horizontally and Vertically that can be used to quickly change the appearance. The flash is only one frame long, so it would take an eagle-eyed viewer to notice that it had merely been flipped or rotated instead of being completely different. An Erode/Dilate can be used to knock off those sparky bits, again creating a slightly different look from the same element.
You probably noticed a few nodes in my flow that I didn't mention. I did a little bit of preprocessing to my element to make it a bit nicer to work with. The alpha channel showed too much of the paper backing behind the squib—I could clearly see an edge—so I used an AlphaDivide to separate the color pixels from the alpha, did a little gamma adjustment to the alpha and brightened the color before remultiplying by the alpha again. This process of dividing and multiplying with the alpha prevents halos from forming in translucent areas. Most color correction tools in Fusion have a switch labeled "Predivide/Postmultiply" that does this for you, but if you're manipulating the alpha itself that switch won't help, and you'll have to perform this process to get the correct results. And then at the end of my chain, I've got a SoftGlow to give the flash just a little more "oomph."
*It would be more efficient to use a TimeSpeed node for the first flash, too, instead of offsetting it in the Loader. Then you could simply type the frame you want a flash to appear in the Delay control. But if we did that, you wouldn't see how the Global In control works.
Interactive Light
We've added a pretty bright element to the shot, and if we just leave it at that, it looks pretty unconvincing. The flash should be casting some light onto James' hand, the gun, and maybe his face. A little roto and a Color Corrector is all we need to fix that!
Go to frame 12, and use a BSpline or Polygon tool to make a rough shape around the fingers. Put a Color Corrector in the Flow where it will affect the plate's colors. I put mine in right before the flash element was Merged in, but it could just as well go after, or even before the Gamut if you prefer to do the correction in that non-linear space, as discussed in the Tracking chapter. Connect the BSpline to the EffectMask input (blue) of the ColorCorrector and adjust the gain until the brightness of the fingers looks about right to you.
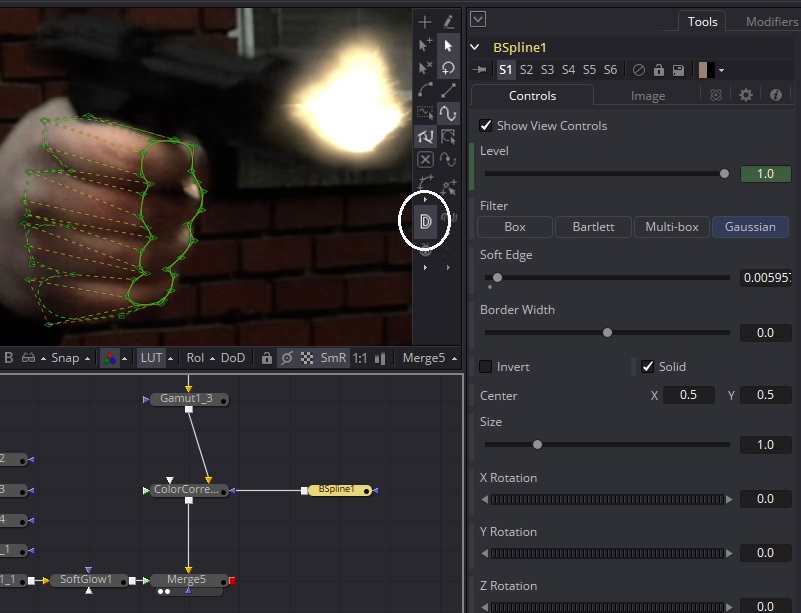
In the image above, you can see that I have made a secondary spline that is connected to the original one. This allows you to create a falloff for one part of the spline that does not affect the other points, as would happen with the Soft Edge  control. To activate this Outer Spline, click the button I have circled in the image above, which looks like a D. The spline points will turn into diamonds, and there will be a dotted line over the solid line, indicating the new outer spline. To select these new points, hit tab to change the active control from the inner to the outer spline. As you drag a point away from the inner spline, the dotted outer spline line will come with it, and an additional dotted line will be drawn between the original point and the new one, indicating the direction of the falloff. If you move the inner spline point, the outer spline will move along with it. You can change that behavior by right-clicking in the Viewport, and choosing Spline:Outer Polygon > Follow Inner Polyline. You can continue to add new points to either the inner or outer spline, but the new points will not have this link.
To turn the interactive light on and off, I have chosen to animate the Blend control of my Color Corrector. You could instead animate the Gain or or the Level control in the spline; it's up to you which is easiest and makes the most sense. Remember, to animate a control, just right-click its label and choose "Animate." Go to frames before and after the flash, and set the Blend to 0 on both.
Make another spline for the face, but since it's so much farther away from the gun, put the spline's Level control much lower. I set mine to 0.15. Any light source's brightness decreases as a function of the square of the distance, so an object that is twice as far away gets lit only 1/4 as much. If you wanted to be physically correct, you could estimate the length of James' arm and the distance from muzzle to hand and come up with an exact ratio. I just did it for fun and learned that I almost exactly estimated a linear fall-off. The correct inverse-square fall-off should yield a level of about 0.02, which is just barely perceptible. Now that I've done the math, though, I'm going to go ahead and use that number. If you connect that second spline to the Effect Mask input of the first, the two splines will automatically be Merged together and both fed into the Color Corrector.
With the much lower brightness of the interactive light, we want just a little something extra to sell the flash. Eyes are very reflective, so we will put a tiny, fake reflected flash in each of James' eyes. This approximation of a reflected light is usually called a specular highlight or spec hit. We'll go into specularity a little more in the chapters on 3D and multipass CG compositing. The location of the reflection is difficult to estimate. It's tempting to put it right in the center of the pupils; after all, he's looking across the sights, so the light should travel pretty much right into the center of his eye, right? That's not the way reflections work, though. Grab any nearby round, reflective or glossy object. Set it on your desk where you can see a light source reflected in it. Now move your head around the object and notice that the reflection travels across the surface based on your point of view. A reflection's location is determined by the location of the light, the shape of the object, and the location of the viewer or, in this case, camera. The eyes are round, and the camera is to the left (in screen space) of the actor, so put the spec hits a little to the camera left of his pupils.
To make the reflections, create two Ellipse nodes and size them down very small: 0.001 in both Width and Height. Just like with the splines earlier, plug one Ellipse into the input of the other. In order to avoid having to adjust their softness individually, make a Bitmap node (it's in the same category as the spline tools) and connect the Ellipses to the gold Image input. The Bitmap can be used to make a single-channel mask image from any other image. By default, it passes along only the Alpha, but you can also set it up to take any of the color channels or the luminance of an image and convert that into an alpha. In this case, we're only concerned with the Soft Edge control, which lets us adjust both Ellipses at the same time.
You could simply Merge the output of the Bitmap tool over the plate (since it's a mask tool, though, the trick of connecting the outputs together to automatically create a Merge won't work). Fusion will interpret the single-channel image as white in all three color channels. We might want to change the color of the reflections to better match the flash, though, so instead make a Background node and connect the output of the Bitmap to the Effect Mask of the new node. Merge the Background over the plate and view the result. The Background's Color is currently black, so you probably don't see much other than a tiny black dot. To get a good, bright spec hit with an appropriate color temperature, drag the Pick… button in the Backgrounds control panel over the muzzle flash. The color will immediately change to match the flash.
Now you can move the Ellipses' Center controls into position in the eyes. To make things a little easier to see, put the image into both Viewers and turn off the Show Controls switch in one of them. You can manipulate the controls in one Viewer and see the results update immediately in the other.
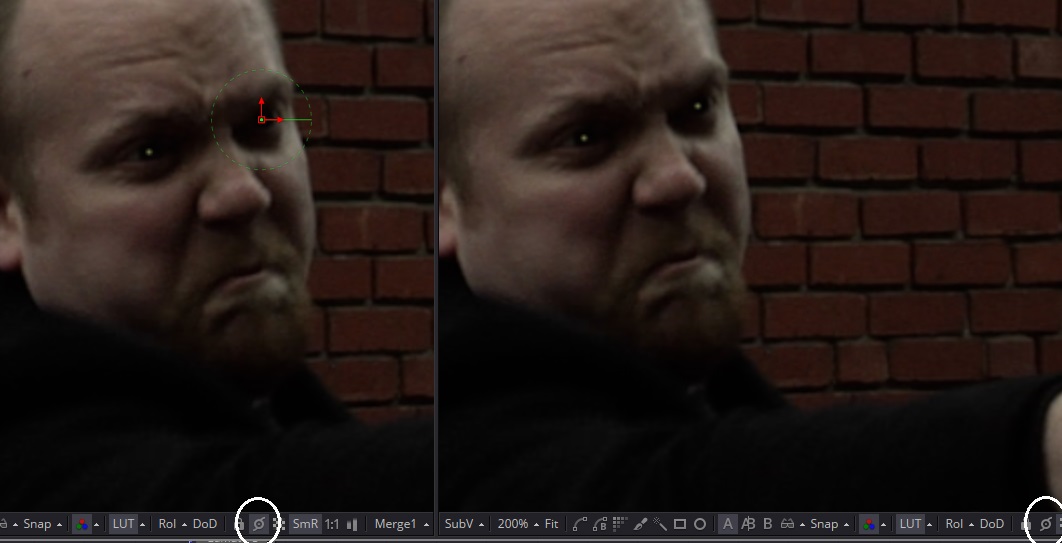
Once you're satisfied with the location of the spec hits, adjust the Blend control in the Merge and the Soft Edge control in the Bitmap until you like the way the frame looks. In a case like this, subtle is better. My Soft Edge control is at 0.0008, and the Blend is 0.05. Finally, we only want to see these reflections on the frames where the flash is present. While you could animate the Blend of the Merge, it would be simpler if the level could be linked to an already-animated parameter so you only have to change one thing. The obvious choice to me is the Blend control of the Color Corrector. If the level of the spec hits were linked to the Color Corrector somehow, that would take care of it. Unfortunately, the CC's blend is animating from 0 – 1.0, and the Merge would need to move from 0 – 0.05. I don't want to lead you down a path that complex quite yet, so instead we'll use the Level control in the Bitmap.
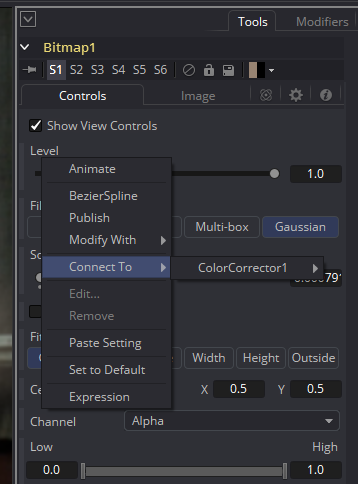 Grab that control and scrub it up and down a few times to prove to yourself that it controls the brightness of the reflections. It's obviously a good candidate for what we have in mind, so how do we connect it to the other tool? Right-click the word "Level," and you'll get a context menu like the one on the left. Choose Connect To > ColorCorrector1 > Blend. The Level control will immediately show up as animated. Better still, you can now control both tools from the control panel of either one! Setting a keyframe on the Level here will set an identical keyframe on the Color Corrector's Blend.
Play the first 20 frames a few times at speed to see how you like it. When an effect only lasts one frame like this one, sometimes you might decide it needs to be more pronounced than you first expected. After evaluating my own comp, I decided to boost the face and the eye reflections to 0.08 and 0.1, respectively.
Once you are satisfied with frame 12, move on to frame 19. Adjust the two masks for the interactive light and the locations of the specular highlights, and set keys on the Color Corrector or Bitmap. Then do the same for each subsequent flash through the end of the shot.
Particle Smoke
Particles are one of my favorite things to toy with in Fusion. I can't say that I'm good at using them, but I do at least enjoy them! To complete this shot, you'll make a small cloud of smoke issuing from the barrel. The element I'm using already has a decent amount of smoke that accompanies the flash, but yours may not. If it does, maybe you can cause the smoke to issue from the cartridge ejection port, although according to most of the reference I've watched, not much comes from there.
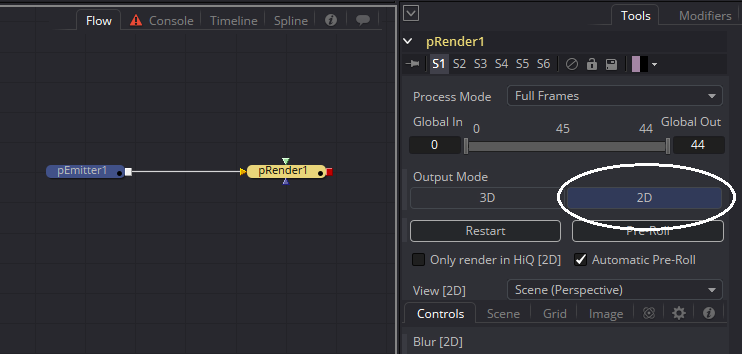
Fusion's particle system requires two nodes to start with, no matter what you're going to do: An Emitter and a Renderer. The Emitter comes in two flavors. The one we use most often is pEmitter. The other is pImageEmitter, which transforms an input image into a particle grid. Start by adding a pEmitter node to the Flow. All of the particle tools are found, appropriately, in the Particles category. Immediately add a pRender. If you put the pRender in the Viewer, you will get a 3D scene view. We don't need 3d particles for this effect, so the first thing to be done is to change the pRender's Output Mode from 3D to 2D.
The Viewer will switch back to it's normal mode, and you'll see the shape of the Emitter, a translation handle, and a few white particles in the center of the frame. If you hit play, you will see the green circle begin to fill up with more and more dots that just sit there. Select the pEmitter, and we'll go through a few of the controls necessary to start making our smoke.
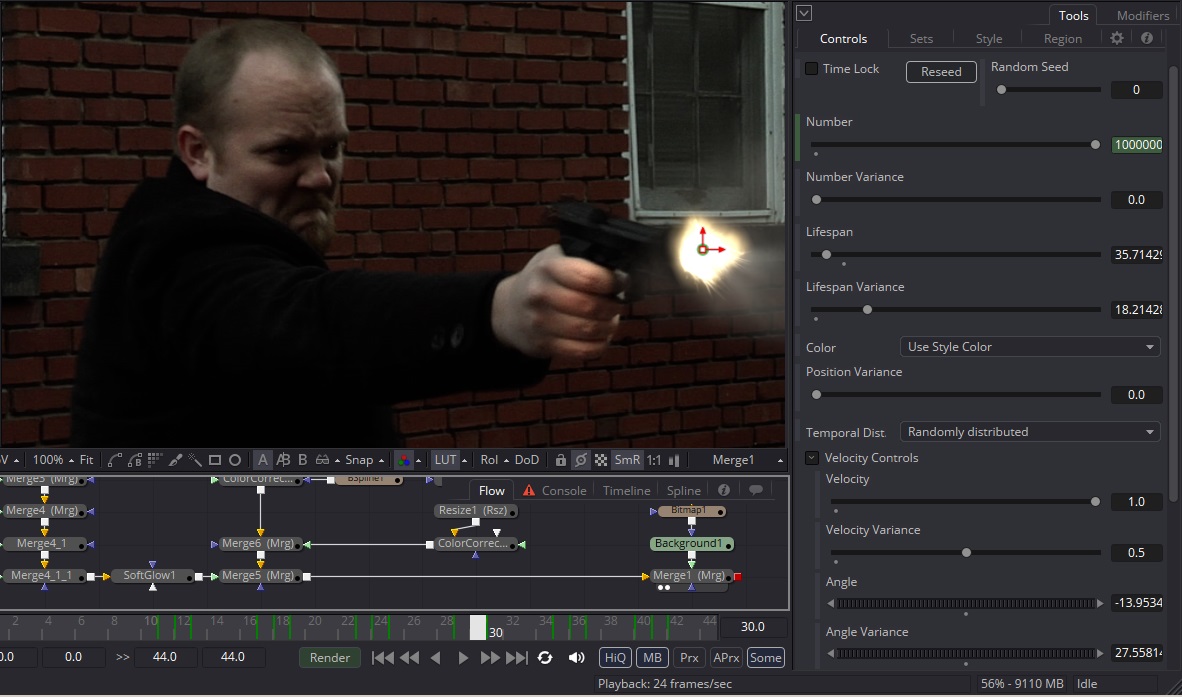
Number controls how many particles are generated on each frame. Since we only want a quick puff of smoke every time the gun fires, this will be the first parameter we change. Go to frame 11 and set a keyframe on the Number control. Set the control to 0. Step forward one frame and turn Number up to 5000 or so. Step forward one more frame and turn it back down to 0. Now when you play the sequence, a cloud of particles will appear at frame 12, and no more will be added. Next we'll adjust Lifespan. The smoke particles should dissipate quickly, so give them a Lifespan of 15.
Many of the controls in the pEmitter have an accompanying Variance control that assigns a slightly different random value to each particle. For instance, if you leave Lifespan at its default of 100 but change Lifespan Variance to 20, each particle will have a randomly determined lifespan from 90-110. This can add a little bit more chaos, and I find I increase most of the Variance controls to about half of the main control's value. In this case, set the Lifespan Variance to 15 as well. Some particles will die immediately at birth, and some will hang around for 30 frames, but on average they'll die out after 15. Give it another play to see how this affects the particles. That looks like pretty close to the right speed of dissipation to me, although obviously we'll need tons more particles to get a smooth-looking cloud.
Don't worry about the look for now, though. First we want to sculpt the behavior with a small number of particles that can be calculated quickly. To get an idea of how the smoke from a gun should act, take the time to watch a few videos, paying close attention to how the smoke moves. There's a really nice Mythbusters video of a Glock at 73,000 fps that I find inspiring. Obviously we don't need to bother with getting an exact replica of that motion since we're working at only 24 fps, but it gives us some idea of what shape the smoke cloud will initially take. Watch it a few times and see if you can imagine the forces acting on the smoke to cause that motion. That will give you a hint about what kinds of forces we want to put in our simulation.
So then, the first thing we need is to give our smoke some initial velocity. The gases pushed down the barrel by the gunpowder explosion are travelling fast. Faster than the speed of sound, which is what creates the bang. Immediately upon leaving the barrel, though, the gas hits the air, which absorbs most of its energy, spreading it out into a cloud and slowing it way down. To start things off, give the particles a Velocity of 1.0 and a Velocity Variance of 0.5. Now they'll shoot off to the right as soon as they appear. They spread out a little bit from the Variance, but we can give them some additional variation by changing the Temporal Distribution from "All at the same time" to "Randomly distributed." Although all of the particles appear on the same frame, that frame is actually divided into many sub-frames, with particles appearing and moving in each sub-frame. Changing the Temporal Distribution causes Fusion to spread particle birth out across those sub-frames, creating yet another source of chaos.
The particles currently all travel in exactly the same direction, which isn't very realistic. In the reference, the smoke issues from the barrel with a spread of about 15 degrees. Let's put that 15 degrees into the Angle Variance to account for it. We also have the problem that our Emitter is much bigger than the gun's barrel. Switch to the Region tab. Most particle tools in Fusion have this tab, which lets you create areas in your scene that the tool will affect. In the Emitter's case, the Region is a spherical area where the particles are born. You can change the region shape with the combo box at the top, but the sphere is perfect for this application. At the very bottom of this tab is a Size control. Adjust the size of the Emitter's region until it's about the same diameter as the interior of the gun's barrel. For reference, you can look at the plate while you're adjusting the Emitter. For that matter, go ahead and Merge the pRender over the plate so you can see where the particles will be in relation to the gun.
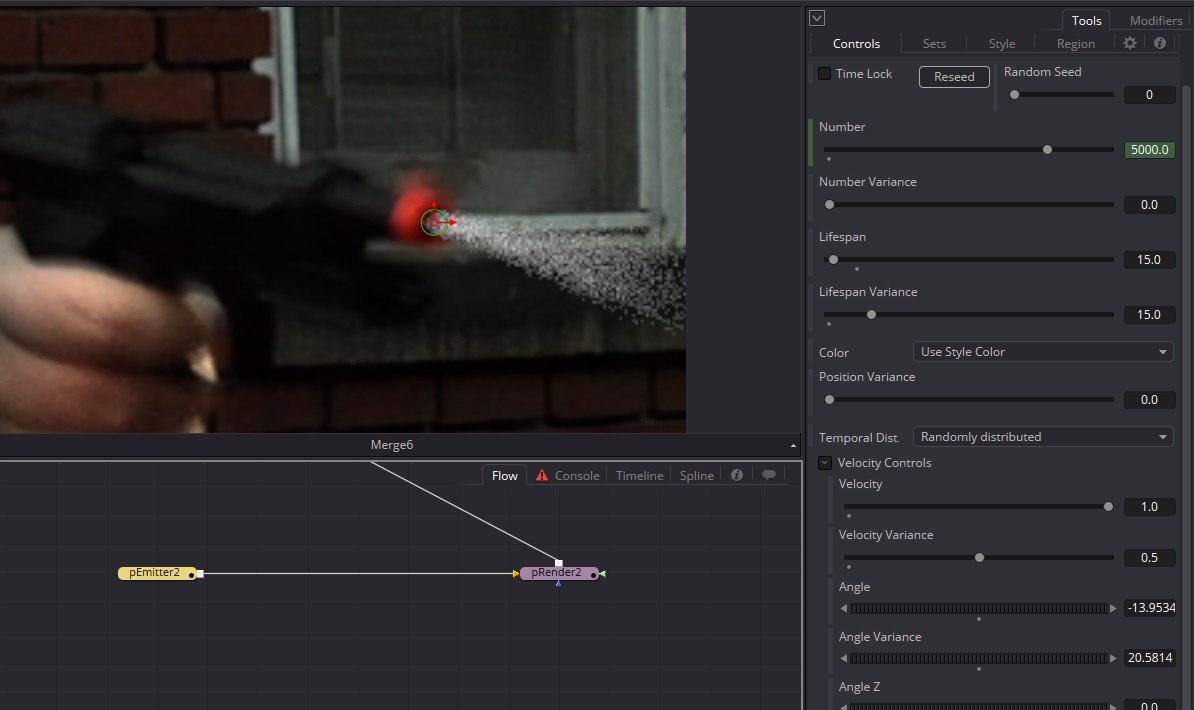
I have adjusted the Angle and Angle Variance a little bit to make the spray of particles look like it's coming from the gun. Although this is a 2d particle effect, you could also adjust the Angle Z and Angle Z Variance to give more of a cone shape to the particle spray. Negative numbers in Angle Z will turn the cone toward camera. The particles are spraying right off the screen now, which is what we'll eventually want, but while we're setting up the behavior, it would be convenient if we could see more of the cloud we're creating. Move the Emitter over near the right edge of the frame while you work on it. You can move it back onto the barrel once you're happy with the behavior.
The smoke doesn't just spray from the barrel and travel in a straight line. The air resistance slows it down and causes it to billow outward. We need some kind of force to apply that will create that kind of effect. This is the point where I usually start grabbing particle tools that I think might have some potential and start experimenting with them. pVortex creates a rotating force, similar to what we see along the outer edges of the reference, so I put a couple of those in there, one above and one below the jet of particles. We need to slow them down significantly, so a pFriction is probably a good choice. We also need some turbulence from the interaction with the air, and there is a convenient pTurbulence node. Finally, the burned gases are hot, which will give them some lift. A pDirectionalForce will give us that. By the way, the pDirectionalForce's control widget is, for some reason, above the frame. The line segment indicates which direction the force will push.
Spend some time experimenting with each of those nodes, one at a time, to see what effect they have individually. Remember that sometimes you can get better results from manually entering negative numbers or numbers much higher than the maximum limit. Once you have a handle on what each tool does, start linking them together. Unlike most nodes in Fusion, though, particle tools cannot be branched. They have to hook up one after the other. Some tools can have multiple inputs, but none can have more than one output. The order in which they process can have a strong influence over the look of the system.
Sometimes you might wish that a node would only affect a certain percentage of the particles, or would only act on them over a certain portion of their lifetime. Take a look at the Conditions tab of any particle tool. The pVortices are especially important to limit in this fashion. Eventually the particles should stop spinning. The Start/End Age range slider lets you dictate when a tool should stop affecting the particles. I set my pVortices' End Age to 0.6. So after 60% of their Lifespan, the vortex can no longer influence them. Also, I set Probability to 0.6 so that only 60% of the particles that enter the field will be spun.
Once you're happy with the behavior you're getting, it's time to move on to creating the look you want. A nice hazy smoke cloud requires a lot of particles. Go back to the frame where the particles first appear and change the Number control in the pEmitter to something obscene, like a million. Literally 1000000.0 particles. Yes, this will slow things down significantly. The wedge of particles will turn solid white with rough edges. If you put your pointer over the wedge, the color readout at the bottom of the screen will probably show values of several hundred, possibly thousands. By default, particles are additive—two particles with values of 1.0 lying on top of one another will create a pixel with a value of 2.0. That's great when the particles are self-illuminated; lots of them packed into a small area will get very bright. Smoke is a subtractive medium, though. Packing more particles in shouldn't create light.
There are a few ways to address this problem. Go over to the Style tab in the pEmitter. Down near the bottom is a control labeled Apply Mode. Changing that from "Add" to "Merge" will ensure that no matter the density of the particles, their aggregate brightness will never go higher than the brightest among them. That solves the superwhite problem, but it also effectively clips the particles and flattens any detail you might see. So let's keep that in "Add" mode and see what other options we have. First of all, the additive property applies not just to the color channels but also the alpha. I'm not sure if that's a bug or expected behavior, but it's certainly inconvenient because it creates many artifacts in other tools. We can fix that problem immediately by setting the alpha to 0.0. The cloud is still super bright, but at least now it can be controlled with a Color Corrector to some degree. You could instead use a BrightnessContrast node after the pRender to clip the alpha. You could also use the White threshold control to remap the range of the pixels. Setting it to a number greater than 1, like 8, dims the entire cloud. I wasn't able to get the results I wanted with the BrightnessContrast tool, though, so I returned to the pEmitter's Style tab.
Why are we using white particles, anyway? Even white smoke is actually grey, and this smoke should be dark grey, with maybe a brownish tinge to it. Set all three color channels to 0.01. That's very dark, almost black, but since the particles are still additive, they should wind up a thin, medium gray. You can dial in the density from there. If you spin down the Color wheel, you can adjust the level of all three channels at once using the Value control. I think 0.01 is a little too dim, and after a few experimental changes, I land at 0.02 as a density that I like. This can be a frustrating process because the millions of particles take quite a long time to process, even if their positions aren't being calculated, but you can't reduce the number because it would change the overall brightness.
Now that you have the behavior and the look you want, it's time to move the cloud over to the gun. We've been developing this thing with the entire screen to play in, but the actual emission point is going to be very close to the right edge of the frame. It is entirely possible that all of the beautiful work you did is going to be happening off-screen. That being the case, you may wish to make some additional adjustments after you've made the move.
First, move the pEmitter's region back to the barrel of the gun. It's probably a good idea to look at just the plate at this point so that you're not recalculating all of the particles every time you make a change. Move the pVortices and any other regions you've set up to their proper positions relative to the Emitter's new location. In the Emitter's Region tab, animate the Translate Group, go to each frame where there's a muzzle flash, and move the Emitter back over the barrel. Set keys on the Number control on the frames before and after each of those frames, and then change the Number on the flash frames to 1000000 (or whatever huge number you settled on). Now you'll get a puff of smoke every time the gun fires.
Merge the pRender over the plate and step through it until a point where you'd expect to see a reasonably good amount of coverage from your smoke. If your cloud, like mine, is completely off screen, you will need to make some adjustments to the forces. I moved my Vortices closer to the muzzle, tipped my pDirectionalForce a little toward the center of the screen in order to blow the particles back into frame, and increased the pFriction. You may want to reduce the Number of particles back down to something a little easier to work with while you do this, and increase their brightness to compensate for the reduced additive effect. You can set those parameters back to where you had them when you are again satisfied with the behavior of the cloud.
Once everything is set back up, it's time to address the quality of the cloud. Even with millions of particles, the cloud may still look grainy. We can fix that by supersampling. Supersampling is a method of increasing the quality of an element by rendering it at some multiple of the final resolution and then scaling it down. Some tools in Fusion, such as the OpenGL 3D renderer, can do this automatically. The pRender node can't, but you can set it up by hand. Switch to the pRender's Image tab, and in the numeric entry fields for Width and Height, put the cursor after the number and type "*4". The value will be multiplied by four, greatly increasing the size of the render. Now add a Blur node and set the Blur Size to 2.0. Finally, add a Resize node and verify that the Width and Height are 853×480, the same as the plate. The smoke should now be much smoother. You can fiddle with the Blur Size to strike the best balance between smoothness and detail in your smoke cloud. Obviously, supersampling will require more render time for the particles, but once you're satisfied with them, you can prerender them so that further changes to the comp never require rendering the particle system again. Prerendering is commonly done to "lock in" a complex section of the composite that you don't expect to change. Make a Saver at the node you want to prerender that points to the folder where you keep the elements specific to your shot, disable any other Savers in the comp, and render, preferably to OpenEXR. Bring the new sequence back in with a Loader and plug it in to any inputs previously fed by the prerendered node. Disable the prerender Saver and re-enable the other Savers. Don't delete any of the nodes you've just prerendered—you may yet need to go back in to change something. So long as they're not wired into the rest of the flow, though, they will no longer slow your comp.
Take a look at the completed comp. The smoke should be Merged onto the plate before the muzzle flash. This smoke is actually the remains of the gunpowder that burned up in the flash, so it makes sense that it would mostly be behind the flash. Let it play a few times and see if there are any changes you'd like to make. It will probably take a long time to cache for the first run through, but after that it should play in real-time, assuming you have enough RAM to hold all of the frames.
Particles are one of the most complex and difficult to master topics in compositing, but in my view, they are also one of the most rewarding. They can be used for rain, snow, sparks, fire, magic, explosions, and abstract motion graphics elements. You can cause them to emit from alpha channels, 3d geometry, or even from other particles. There are situations where you might need just a handful or particles or others, like this one, where you need millions. Fusion's particle system doesn't give me absolutely everything I want, but it serves for 80% of my particle needs.
Final Touches
There are a couple more things that could be done here to really take this composite to the next level. Some additional interactive light from the flash onto the smoke would look nice. You could create and animate shell casings ejecting from the gun. Perhaps add just a little 2d camera shake, and perform some color grading to improve the contrast. If you can find a set of muzzle flashes that look like they're all from the same gun but aren't identical, that would be a nice improvement rather than rotating and flipping a single element.
If you had a hard time getting your smoke cloud to look good, it might be instructive to see what I did. Here are my nodes; just copy this code and paste it into your Flow View: